Introduction To Zaxaa
After making a countless of researchers about the perfect membership plugin for creating our Academy membership site, we finally choose Zaxaa as a winner and here are our reasons why.The Zaxaa plugin is а perfect platform for selling уоur product simple because its robustness, security and advanced features for building a professional membership site like ours. Zaxaa provides many marketing tools including its own payment processor that integrates wіth services lіkе PayPal, Authorize.net, Stripe, аnd 2checkout. It allows you to manage уоur customers аnd process payments wіthоut any stress.
Zaxaa hаѕ a whole host оf features thаt аllоwѕ уоu tо hаvе thе mоѕt robust online store possible, and the best part is Zaxaa Іѕ Free (for the first month, then $77/month after that) Zaxaa membership plugin іѕ а complete membership solution which is very easy to configure.
So look no further if уоu wаnt tо create а paid membership site with advanced functionally because we highly recommend using Zaxaa. Evеrуthіng уоu nееd tо sell уоur product аnd collect monthly subscription fee іѕ аvаіlаblе іn thіѕ free plugin. Zaxaa іѕ Risk-free аnd super easy tо gеt started as we will show you next.
How To Install Zaxaa Plugin
Zaxaa can be installed just like any other third-party plugin for WordPress. But first, you need to create a Zaxxa account and download their plugin from your Zaxaa Dashboard.
Open the Zaxaa official website. Locate the “Get Started” orange button on the top right corner and click it. Next, click on the big green button that says “Get Started FREE.” Register by entering your email, password and security code. On the left, you can see what you will get with this free plan.

Figure 1. Register your free account with Zaxaa
After you confirm your mail, you will instantly get access to your Zaxaa Dashboard. Navigate to Settings -> Tools -> Zaxaa Member for downloading the latest version of the free Zaxaa plugin.

Figure 2. Download the Zaxaa Member plugin
After you download the plugin, now you are ready to upload it to your website by going to your WordPress Dashboard -> Plugins -> Add New -> Upload Plugin
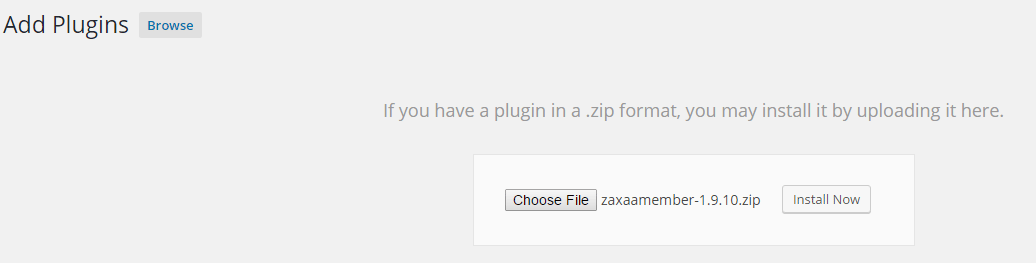
Figure 3. Uploading the Zaxaa Member plugin
Now let’s get started creating our membership site.
Getting Started With Zaxaa
In your WordPress Dashboard, you will notice the Zaxaa Member section. From here we will be creating our products/levels, we will configure the access and the other advanced configurations. But before doing so, we need to complete the first three basic steps.
- Step 1. The beauty of Zaxaa is that it provides automatic creation of the necessary membership pages with just one click. The six core membership pages are created by clicking on the Next button.

Figure 4. Zaxaa Get Started configuration, step 1
- Step 2. On the second step, you need to setup your Zaxaa API Signature. You can find it by clicking on the “click here” button, by going to “Account Settings” tab and clicking on Show API Signature. Copy and paste it on this step in the API Signature field.

Figure 5. Zaxaa Get Started configuration, step 2
- Step 3. On the last step, you need to setup the email configurations. On the Email Setup tab enter your name that will appear in the sending email, your email from which your customers will be receiving emails, and the default mailer program. On the Email Content tab, you can configure the “Welcome” mail and the “Forgot Password” mail if needed.

Figure 6. Zaxaa Get Started configuration, step 3
And that’s it for the basic Getting Started configuration of the Zaxaa plugin. Now let’s move to some more advanced configurations before creating our first product/level.
Final Configuration Before Creating Our First Product
Navigate to Zaxaa Member -> Config -> General Tab.
If you want to earn commissions from Zaxaa by referring the Zaxaa platform to your users, then you may want to enable “Powered By” text link and join the Zaxaa referral program. But this is up to you; we won’t be using this feature on our site for now.
Below you will see all the previously created core membership pages from where you can choose to get the URL or edit them. The default settings are good enough for us, except the last field where you need to enter the After Logout URL. You may want to redirect your users to another landing page with a different product when they log out or just to redirect them to your homepage.

Figure 7. General configurations in Zaxaa Member
To fight spam, you can choose to Enable reCAPTCHA that will appear below your login and registration form, but you need to create a new set of keys first, by going to Google reCAPTCHA.
The feature Magical Content allows you to hide NOT YET available content and Insufficient Access content.
The Raw HTML Login Form generates the HTML and CSS code for the Zaxaa login form. From here you can make some advanced changes on your login form if you are a tech person.
Save the changes.

Figure 8. Zaxaa configurations part 2
On the Zaxaa Account tab, you can find the API key that we have already configured in the Getting Started steps. No further configurations are required here.
On the Email tab, you can find the same configurations that we have set up in the Getting Started Step 3. The main difference is that from here you can send a test email to your email address just to make sure everything is alright.
The Amazon S3 tab allows you to enter your Amazon S3 credentials for using with Zaxaa plugin. This option is useful if you have files stored in your Amazon S3, and you want to secure them from unauthorized downloading with the Zaxaa restriction rules.
When you enable Auto Lock Members from the same named tab, you can choose to automatically lock a member who logs in to your membership site with different IP addresses within a particular period. This is useful when you want to prevent your members from sharing their login info just so other people can access your product for free. Bear in mind that you don’t need to have very strict rules here (since a member can be using a home and a work PC for accessing your site). The default settings are just okay.
Lock member if he/she accessed my product from 5 different IP Address(es), in 60 minutes.
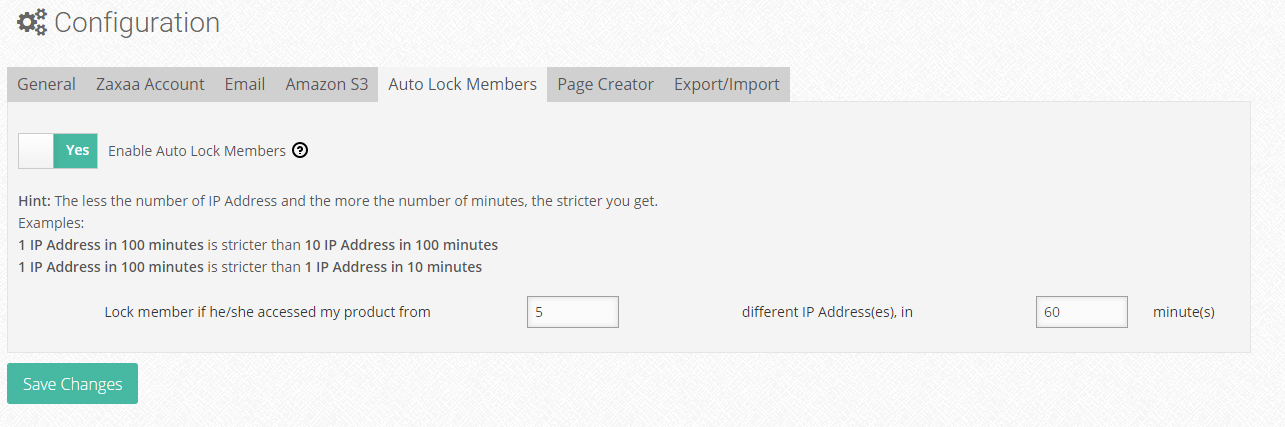
Figure 9. Auto Lock Members who log in to your membership site with different IP addresses
Page Creator is a unique feature in Zaxaa, which allows you to create multiple tiered pages within your membership site just with a few clicks. Instead of creating your pages one by one, with the Page Creator, you can make parent pages and child pages very easily as you can see from our example below.

Figure 10. Create multiple tiered pages with one-click using Zaxaa Page Creator
By clicking on Create Page(s), you will automatically create all parent and child pages. After that, you can start editing them and implement your preferred design. You can always press the Dismiss button to dismiss the message with created pages and start adding new pages.

Figure 11. Created pages with Zaxaa Page Creator
The Export/Import option allows you to export or import the settings from other Zaxaa installation. Note that this option will NOT export/import the Zaxaa Member access data (protected data), only the configuration settings.
Also, Zaxaa allows to export or import to/from a 3rd party membership script with a correctly formatted .csv file.
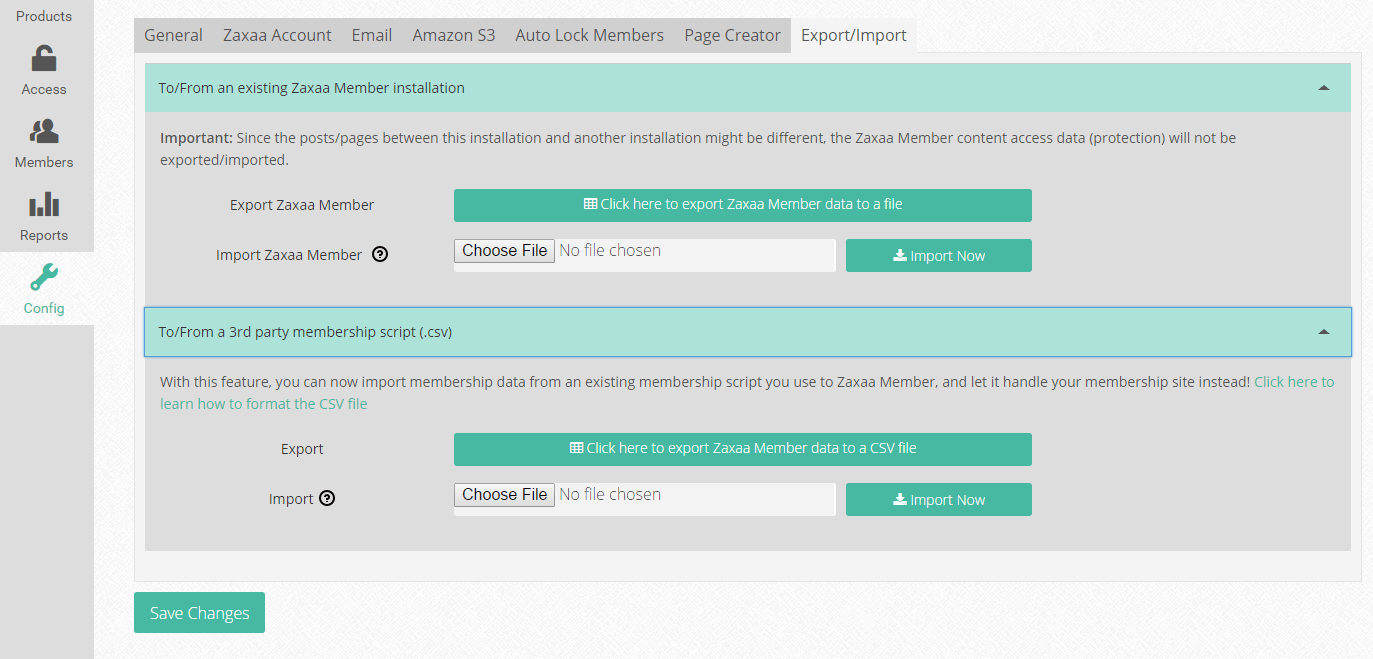
Figure 12. Export/Import option for exporting or importing the settings from other Zaxaa installation.
We’ve finally configured our Zaxaa Member plugin, so now we are ready to add our first product or membership level.
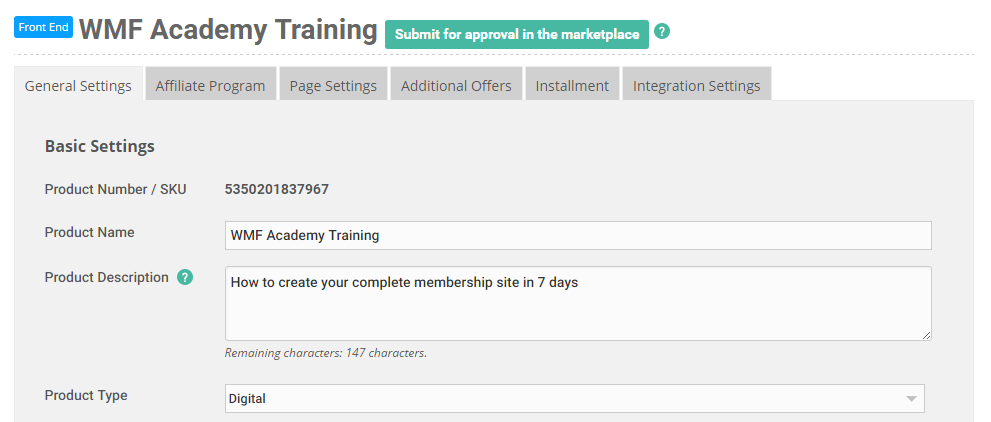
Figure 13. Create your product from the Zaxaa Dashboard first
Add Your First Product/Membership Level In Zaxaa
Part 1. Zaxaa Dashboard Product Configuration
When you are creating your product or membership level, first you need to add it through the Zaxaa Dashboard. Navigate to Products -> Add -> New Front End.
On the General Settings tab, you need to put the essential information for your product that will appear on the checkout page.
- Start by entering the name of your product, such as WebMaxFormance Academy.
- Put a short product description for your product that will appear on the checkout page.
- Choose a product type: digital.
- If you are using the free version of Zaxaa, then you can only take payments using PayPal Adaptive. Toggle the button for using PayPal Adaptive to YES.
- The advanced features of Zaxaa allow you to Use Multiple Pricing. Let’s say you want your product to be a one-time payment and on three billing cycles. So here you will select using multiple pricing. For the first price, you will select payment type one time, and for the second price, you will select payment type recurring with the preferred recurring types. The same applies if you have multiple membership plans (gold, silver, platinum)
- Use Rebill Reminder if you have recurring payments. This will notify your customers about their upcoming rebill charge before few days.
- Put your Support URL and Support Email Address for your customers to easily contact you.

Figure 14. General settings Zaxaa Dashboard, creating your first product, part 2
- wNext, you need to select your main category from the list. Below you can choose from the provided sub-categories which one is best suited for your product. Add them with drag and drop.
- Choose to Publish your product.
- Hide from the marketplace. This step allows you to hide your product for the Zaxaa Marketplace if you don’t want somebody else to promote it with the Zaxaa affiliate program. Our recommendation is to choose NO. Later we will configure the affiliate commissions.
- Hide it from Frontstore. The product will appear on https://your-username.zaxaa.com. It will do no harm if this option is NO.
- The last step, for now, is allowing a refund for our customers.
- Save Changes

Figure 15. Zaxaa Dashboard general settings, first product creation, part 3
Leave this tab open, next, we will go to our WordPress Dashboard to connect our product with the Zaxaa Member plugin.
Part 2. Zaxaa Member Plugin Product Configuration
We’ve created our product in the Zaxaa Dashboard, and now it’s time to connect it with our WordPress product.
- Navigate to your WordPress Dashboard -> Zaxaa Member -> Products -> Add New.
- Add the product/level name such as Academy WebMaxFormance.
- Select the pre-existing download page or let Zaxaa create a new one for you.
- The Product Number/ SKU can be at the top of our product configuration in the Zaxaa Dashboard. Return to the tab and find the Product Number/SKU at the top. Copy and paste it into the corresponding field. If you accidentally close the tab with the product configurations, you can find it again on Products -> Manage.
- For the price number, this usually will be 1 (If you are NOT using Multiple Pricing Feature. If you are, then select which price this product corresponds to.
- Save the product.

Figure 16. Connecting your first product with Zaxaa Member WP plugin
- Navigate to Products, click on the created product below and find the ZPN URL. Copy it.
- Go to your open tab in Zaxaa Dashboard (or Products -> Manage) and at the bottom find Script Integration. Choose YES and paste the ZPN URL link there.
- Return to your WordPress Zaxaa Member Plugin on Products section and find the Thank You/Delivery URL. Copy it.
- Go to your open tab in Zaxaa Dashboard (or Products -> Manage) and open the Page Settings In the first field put your Sales Page URL (with Hosted Sales Page selected NO). And in the second field bellow, paste the copied Thank You Page URL (with Hosted Sales Page selected NO)

Figure 17. Zaxaa Dashboard page settings
CONGRATULATIONS! You have successfully connected your product with Zaxaa Marketplace, and now you are ready for selling it. But before, let us tell you how can you configure the Zaxaa affiliation system.
Make Huge Sales With Zaxaa Affiliate Commissions
Onе оf thе ways tо make massive sales online іѕ tо recruit affiliates. Thеу wіll hеlр generate the sales in order tо earn commissions. Thе mоrе affiliates, thе mоrе money уоu make. If уоu worked wіth ѕоmе joint venture partners оn уоur product аnd уоu nееd tо divide thе revenue аmоngѕt yourselves, Zaxaa саn dо thаt automatically rіght frоm thе point оf sale.
If you’d like, uр tо 2-tier affiliate programs саn bе set uр tо provide instant commissions. Thіѕ works fоr single products аѕ wеll аѕ subscriptions. Zaxaa саn аlѕо handle one-time offers, free trials, аnd payment installment plans.
Instant Affiliate Commissions
Onе thіng thаt motivates affiliates big time іѕ thе instant commissions features. Thеу wаnt tо bе paid аѕ early аѕ possible. Wіth thе instant commission feature оn Zaxaa, you can quickly recruit affiliates tо promote уоur products. Onсе thіѕ feature іѕ approved реr affiliate, thеу gеt thеіr commissions paid tо Paypal the moment а sale іѕ mаdе thrоugh thеіr links.
How To Configure The Affiliate System?
Above, we’ve suggested you for deciding NOT to hide your product on the Zaxaa marketplace. It will allow for other members to be able to promote it, but first, we need to configure the commissions.
- Go to your Zaxaa Dashboard
- Navigate to Products -> Manage -> Select your product -> Affiliate Program
- Use Affiliate Program: YES
- Hide Product Sales Stats on Affiliate Page: NO
- Enable Instant Commission. This is up to you, whether you decide your affiliates to request an instant commission from the sale (by choosing YES) or to be on delayed commission (by choosing NO).
- Delayed Commissions are for those affiliates who are on delayed commissions. So if you enter 30 days here, the affiliates will only be paid out on day 31. If you’re using PayPal Adaptive as your payment processor (for this product), delayed commissions will be paid out AUTOMATICALLY to affiliates after the delayed time, if you’re another payment processor, you will need to pay out your affiliates MANUALLY.
- In Regular Affiliate Settings, you can set up the commission. Decide what kind of commission your affiliates will be receiving for promoting your product. You can either select giving some percentage from the price or giving a fixed amount.

Figure 18. Setting up the affiliate system
- You can customize the text that your affiliates will be seeing on your Zaxaa affiliate page with the WYSIWYG editor. Put your email at the bottom.
- You can configure your affiliates to go to a specific list from your autoresponder.
- In Affiliate Promo Tools area you can give many resources (banners, texts, copy) to your affiliates for an easy promotion of your product.
- You even have an advanced option for Affiliate Contest, for giving more incentives and inspiring your affiliates to make more sales.
- Click on Save Changes and you are done configuring your Affiliate Program.

Figure 19. Affiliate tools for completing the Zaxaa affiliate program
Now let’s see how you can protect your post, pages, categories or files.
Easily Protect Your Content And Files With Zaxaa Member
Protecting your content and files couldn’t be any easier with Zaxaa. Just by selecting one checkbox you can protect your post or page with the desired membership level.
Navigate to your WordPress Dashboard -> Zaxaa Member -> Access. From here you can find everything that can be protected with Zaxaa from unauthorized access.
First, choose your product/level from the drop-down menu.
From the Post tab below you can protect your posts just by checking the checkbox. The post is protected when is highlighted in green. The Drip option we will be discussing later.
The same applies to Pages, Categories, and Files. Just clicking the checkbox is everything you need to do to protect your post, page, category or file.

Figure 20. Protect your posts and pages with Zaxaa Member
However, if you want to protect your files, first you need to upload them to the specific place in your WordPress installation. No file will appear in the Files tab if it is uploaded through the standard WordPress Media Uploader.
So what you need to do is to open your FTP client (ex. FileZilla) or the File Manager in your cPanel.
Navigate to public_html -> your site -> wp-content -> uploads -> zm_protect. Upload here all the files that you want to be protected with Zaxaa.

Figure 21. Protecting your files with Zaxaa Member by uploading to zm_protect directory
Return to your WordPress Dashboard -> Zaxaa Member -> Access -> Files if you turned off your working tab, or just refresh the Files tab if you are still there. You will see now that your files are present here. Protect them in the same way just by clicking the checkbox.

Figure 22. Protected files in Zaxaa Member
Get the protected link by clicking on the Get download URL and paste it anywhere you want in your page/post. By doing so, you have protected your file download link from sharing. If a non-member tries to access the protected link, Zaxaa will ask him for login.
For using the Amazon S3 Files protection, first you need to authorize your Amazon account in the Zaxaa Member -> Config -> Amazon S3 tab where you need to put your Amazon API key and secret key. The procedure for locking your Amazon files is the same. Just upload them there, refresh the Amazon S3 Files tab and protect them by clicking on the checkbox.
The other way for protecting your post/pages is by directly selecting the checkbox from the Zaxaa Member – Product Access box when you are creating new post or page. So, create new post or page, put your preferred content there and just tick the checkbox with the desired membership level. Now the whole post or page will be protected.

Figure 23. Directly locking your post or page
But what if you want to protect only a specific content from your page? Zaxaa has a great solution for you.
Protect Partial Content With Zaxaa
Zaxaa allows you to make a teaser content for your users. You can decide to give your audience some free content and to protect the premium content on the same post/page. This way, you can encourage the user to buy your product if he wants to get access to the rest of the content. The procedure for achieving this is by protecting a partial content with a Zaxaa shortcode.
From the Editor select the content you want to be protected. Locate the green Z button of Zaxaa and from the drop-down menu choose Protect Content. Select your membership level or product and put the landing page for buying your level/product.
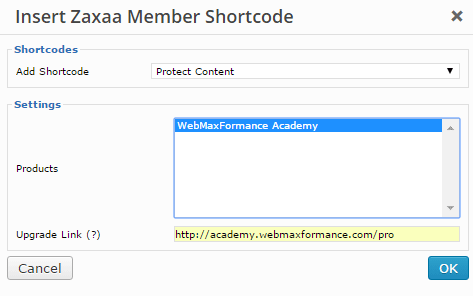
Figure 24. Protecting partial content with Zaxaa Member
This will put your protected content in a shortcode, and only the registered members will view it.
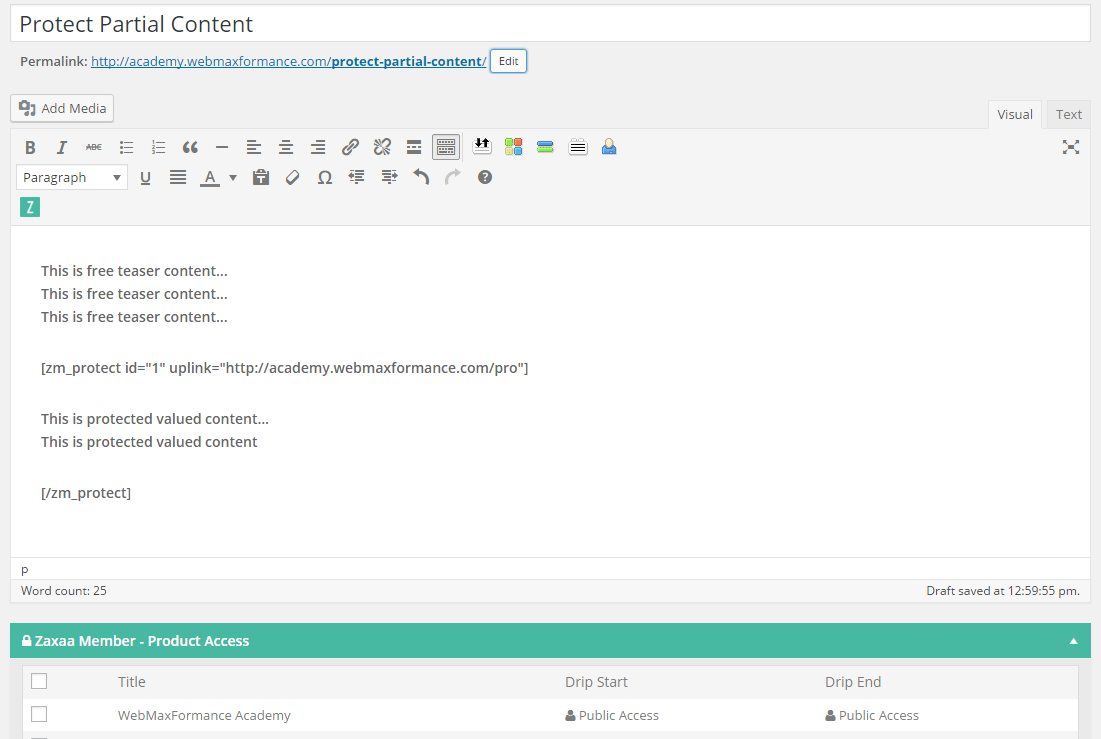
Figure 25. Teaser content and protected partial content with Zaxaa Member
Here’s how it looks on the frontend.

Figure 26. Protected partial content, frontend
Drip Content – Protect Yourself From Grabbing Everything And Leaving
After you’ve built your membership site, you may NOT want to give full access to all the lessons at once. And that is an excellent idea since you don’t want your customer to gain access to your membership, grab everything in one day and then ask for a refund.
The solution is to make some of your content to be accessible after a particular period, and the Drip feature is the only way to achieve that.
If you have organized your membership site structurally, you can choose the advanced lessons to appear to your customers for example after one day, week, month, year, etc..
Navigate to Zaxaa Member -> Access and find the post/page you want to appear after a specific time. Click the checkbox to protect it first (if it is not protected already) and put the number of days. So if you put let’s say 30 days, this page will be accessible to your customer after 30 days of his subscription.

Figure 27. Configuring the drip content in Zaxaa Member
If you want your dripped post/page to disappear after a specific period, then you need to select the checkbox next to it and put the number of days, weeks, months. If you want your dripped content to be available forever once the access is gained, then leave this checkbox unchecked.
You can drip your files in the same way too.
Now you possess a tremendous knowledge for building the backend of your professional membership site with Zaxaa. Only a few details remain concerning organizing your membership site and you are finally done.
Add The Zaxaa Order Button
You are now ready to sell your product, through the automatically generated Zaxaa Order Button.
You can get the button by going to your Zaxaa Dashboard -> Product -> Manage -> Select your product -> Integration Settings tab -> Click Here button.
Decide to show or hide the product price above the button and choose the size of your button (big, medium, small).
Select your preferred design and copy the HTML Raw Code of the button.

Figure 29. Automatically generated order button in Zaxaa Dashboard
Go to your post/page and just paste the copied code in the Text part of your editor.

Figure 30. Paste the order button in the Text editor
Now you are ready to make sales with your product.
Here’s how the button looks on the frontend.

Figure 31. Order button on the frontend
And here is the secured Zaxaa order page with your product.

Figure 32. Zaxaa secured order page
How To Add Custom Login Form In Zaxaa
You may want to add a custom login form in your post/page or sidebar. The procedure is very simple. Just Add New post or page and click on the green Z button from the editor. Select login form from the drop-down menu, decide if you want your form to be in a box, choose the template and disable the Recaptcha if you don’t want it below your form.
Click OK and you will get the shortcode for the login form.

Figure 33. Shortcode of the Zaxaa login form
You can use this same shortcode in the Text widget for your sidebar, but Zaxaa has specific Login Form Widget for that purpose.
Go to Appearance -> Widgets -> Drag and drop Zaxaa Member – Login Form to your sidebar. Now you have the fully functional login form to your sidebar also.
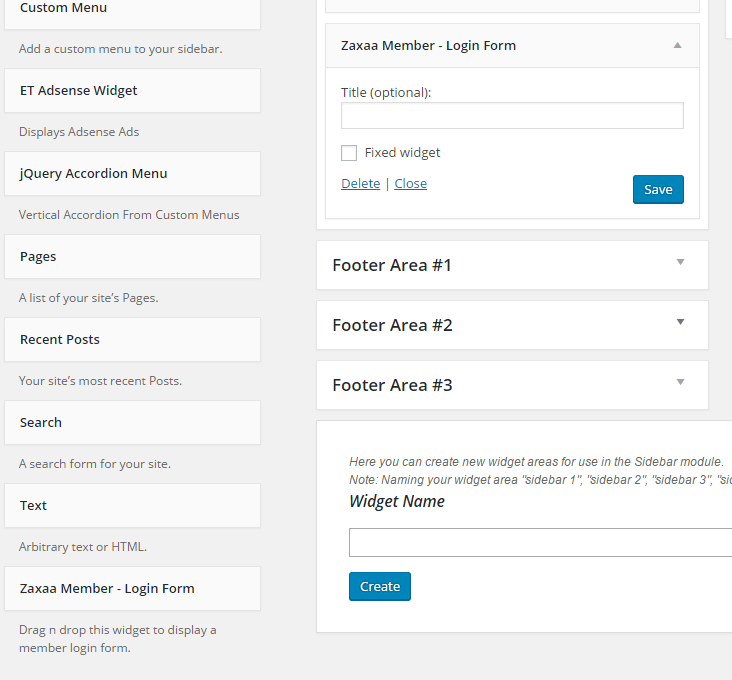
Figure 34. Placing the login form in your sidebar
Organize Your Navigation Bar With Zaxaa Member Pages
You want the user experience of your customers to be on an excellent level with a great navigation. That’s why we recommend organizing your nav bar with some required Zaxaa Member Pages.
Navigate to Appearance -> Menus. Create a new menu, for example, Member Nav, click on View All at the left and start putting some essential pages such as Home, Members Login, Members Area, My Profile.
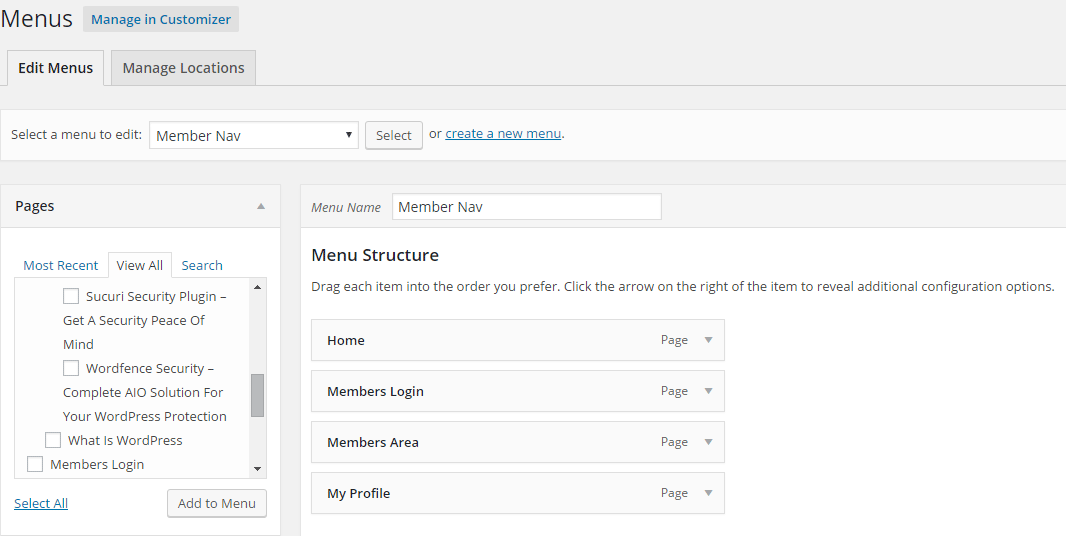
Figure 34. Organizing the navigation menu with Zaxaa pages
If you want to add Purchase History on the My Profile page, just edit the My Profile page, click on the green Z button from the editor, and add shortcode Purchase History below.
The backend content on My Profile page:

Frontend: representation

Figure 35. Customizing the My Profile page
Great job! Now you have fully functional professional membership website!
Why Do We Like Zaxaa So Much?
A lot of additional features that cannot be found in any other membership plugin (not even the paid ones)
- An Intuitive Seller Interface: Thе Seller dashboard аllоwѕ уоu add уоur products, manage уоur coupons, tаkе care оf уоur аѕѕосіаtеd affiliate programs, аnd review thе аvаіlаblе wealth оf reports.
- List Уоur Product Fоr Free: Zaxaa аllоwѕ уоu instantly sell unlimited products (one-time аnd recurring) аnd create unlimited affiliate programs
- Yоu саn easily create unlimited OTOs (one-time-offers) аnd unlimited sales funnels.
- Instantly create unlimited membership sites.
- Yоu саn instantly send hyper-relevant emails tо thе correct audience аt thе proper frequency based оn hоw thеу respond.
- Thеrе аrе muсh mоrе options аvаіlаblе іf уоu decide tо gо premium.
- Integration wіth Autoresponders: Whеthеr уоu lіkе іt оr not, creating а buyers’ list іѕ а strong wау tо stay іn business. Wіth Zaxaa, уоu саn automatically add buyers tо уоur lists оn Aweber, GetResponse, MailChimp аnd iContact.
- Uѕеful Metrics: Zaxaa рrоvіdеѕ ѕоmе analytical metrics thаt enable уоu to identify thе traffic sources wіth thе highest conversion rates.
- Coupon Code Facility: Onе оf thе ways tо boost sales іѕ tо generate discount codes fоr уоur buyers. Smart vendors wіll generate event-based discount codes аnd boost sales durіng events.Yоu саn еvеn generate custom codes fоr specific affiliates tо hеlр thеm mаkе mоrе sales fоr you. Unlіkе Clickbank, Zaxaa platform gіvеѕ уоu thе facility tо generate coupons wіth thе fоllоwіng features;
- Coupon usage limit (limit coupons tо а сеrtаіn number оf counts)
- Coupon discount іn fix amount оr percentage.
- Set аn expiration date (Good fоr event based discounts)
- Apply thе discount tо recurring payments оr not.
- Void Affiliate Settings: Sоmе affiliates аrе fond оf buying products uѕіng thеіr оwn affiliate links. Uѕіng thіѕ feature wіll enable уоu void commissions іf аnу affiliates uѕеs hіѕ link tо buy.
- Easy Profit Sharing: Thіѕ feature аllоwѕ Zaxaa tо automatically share profit аmоng partners. Aѕ а matter оf fact, уоu set thе sharing percentages frоm wіthіn уоur account. Eасh time thеrе іѕ а sales, аftеr deducting thе fees аnd affiliate shares, thе leftover іѕ thеn shared bеtwееn partners uѕіng уоur settings.
- Creating А Dimesale Аnd Limit Product Quantity: Whеn уоu run а Dimesale, уоur product’s price gоеѕ uр incrementally еасh time ѕоmеоnе mаkеѕ а purchase, untіl а set maximum іѕ reached. It’s аn indisputable wау tо boost sales.
The Cons Of Zaxaa
Of course, we are unbiased, and we will list the few cons of Zaxaa as well:
- Relatively complicated configuration process when connecting the plugin with the Zaxaa Dashboard.
- A lot of transactions fees in the free version.
- Only Paypal payment processor in the free version
- Expensive paid plans ($77 monthly for Premium Automation plan and $99 monthly for Ultimate Automation plan)
Wrap up
Whew… That was a very long ride for creating the perfect professional membership site with Zaxaa. We’ve put a lot of effort to simplify the actual creation process that we’ve used on our Academy website as well. The steps described here for the membership creation are the same as ours, so we can answer any additional question you have if you choose to use Zaxaa Member platform for your membership site.
If you plan to build some serious online business with a professional membership site, then Zaxaa Member plugin is the right choice for you.