When we talk about most popular membership plugins for the WordPress, DAP has a prominent place among web owners. It allows you to convert your ordinary WordPress blog into a powerful membership site by selling access to your virtual product.
Digital Access Pass is a premium membership plugin for WordPress. You just need to invest 60 minutes in installing & configuring it after your purchase. Afterward, the customer can easily visit your website and buy the desired product you are offering.
After your DAP purchase, you will be given the access details to your DAP members panel from where you need to download the latest zip files of the plugin.
DAP Installation
The actual installation of Digital Access Pass is a little bit different than other WordPress plugins. There are 2 methods:
- Installing DAP through the DAP Easy Installer plugin (new method)
Once you’ve purchased the DAP plugin, in the Members area you will find the Easy Installer Plugin. Download it and unzip it. You will end up with 3 zip files:
- DAPEasyInstaller.zip
- DAPvX.X.X.zip
- DAPLiveLinks.zip
Now enter WordPress Dashboard and upload the DAPEasyInstaller plugin like any regular third party WordPress plugin. Activate the plugin.
Next, you will notice a new option: DAP Easy Installer by navigating to your WP Dashboard -> Settings. Follow the steps. First, put your license (found in your DAP members area). On Step 2 upload the DAP zip file. On Step 3 upload the DAPLiveLinks zip file. Activate the plugin in your WP Dashboard -> Plugins.
Go to Settings -> Permalinks and choose Post Name.
That’s it for this method.
- Installing DAP through FTP (old method)
If for some reason you don’t have access to DAP Easy Installer (but only to DAP zip file and DAPLiveLinks zip file), here’s what you need to do:
- Extract the DAP zip file.
- Open your FTP client (FileZilla)
- Upload the entire DAP folder (make sure there is no another dap folder within it), to the root of your domain. The root directory is usually “public_html”
- Upload the entire DAP-WP-LiveLinks folder to your WordPress plugins directory (wp-content/plugins/)
- Log in to your WordPress admin panel and go to the “Plugins” page to activate the DAP-WP-LiveLinks plugin.
- Navigate to Settings -> Permalinks and choose Post Name.
With that being done, we’ve covered the second method.
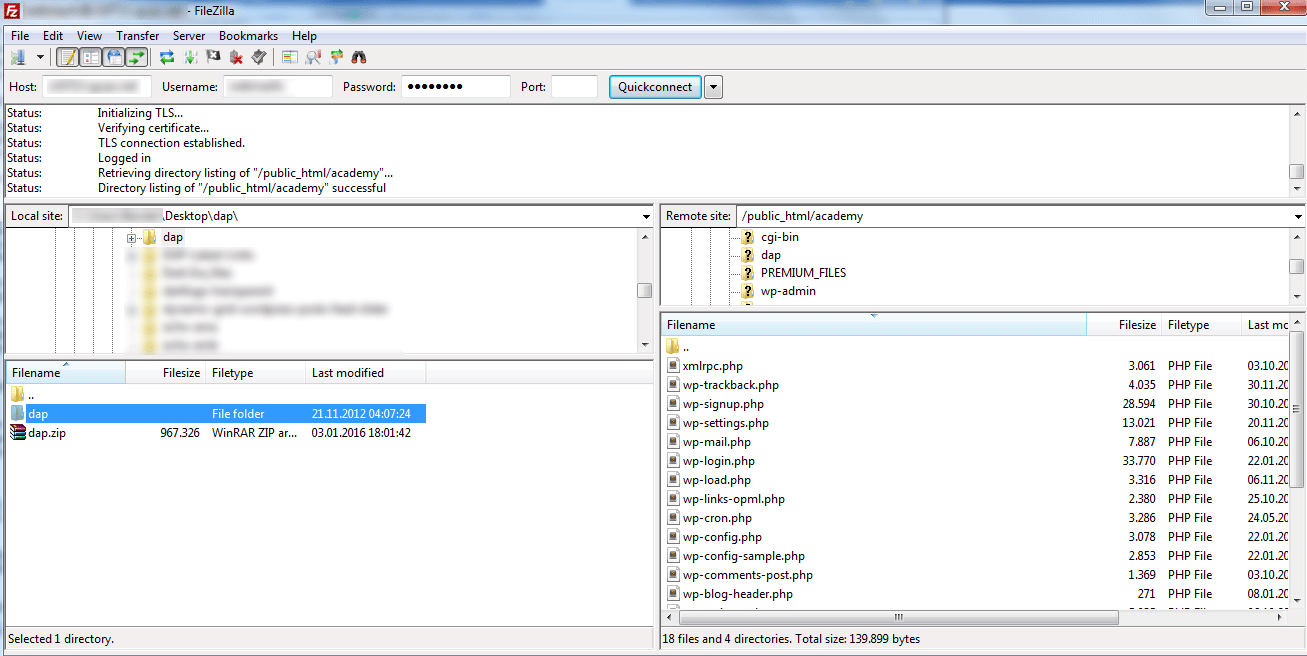
Figure 1. Installing DAP through FTP
Now you can access the DAP admin panel from 2 places:
- By external DAP Dashboard (Ex. https://webmaxformance.com/academy/dap/admin/)
- Internally within your WP Dashboard -> Digital Access Pass (DAP)
Creating Your First Product In Digital Access Pass
Just like any other great membership plugin, DAP also allows you to create any kind of product you want (subscription-based or one-time product)
Open your Digital Access Pass Dashboard and navigate to Products -> Manage.
General Settings
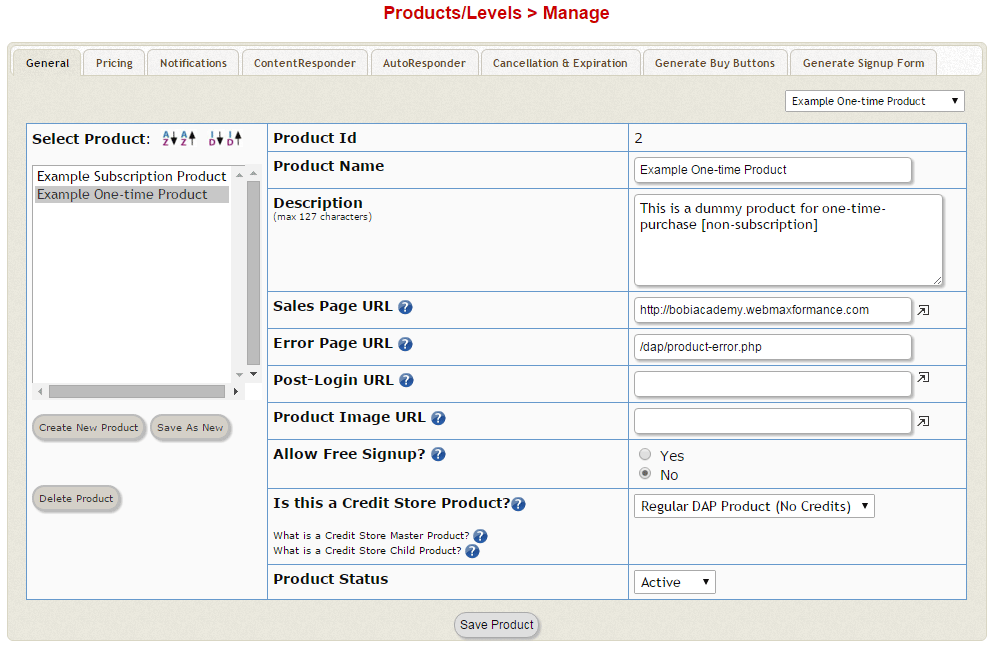
Figure 2. DAP Product creation
As you can see from the image above, on the left you need to select your type of product. Let’s say you have a recurring product based on monthly subscription.
Select Example Subscription Product and click on Save As New -> OK. This will create a copy of the example subscription product that you need to edit it such as:
- Put your product name such as: Academy Monthly
- Put a brief description for your product.
- Put the Sales Page URL of your product (the main landing page).
- Error Page URL leave as it is.
- In Post-Login URL put the URL after the user successfully logs in (your Members area).
- Upload the image of your product to your WordPress Media directory, get the image URL and put it in Product Image URL. Click on the arrow up icon next to it to test if the link is correct.
- Allow Free Signup: NO
- Is this a Credit Store Product: Regular DAP product (no credits)
- Product status: Active
- Move to the Pricing tab

Figure 3. Creating subscription based product in DAP
Pricing Settings
On this tab, we will set all pricing options for our product.
- Is this a FREE product: NO
- Will there be Recurring Payments: YES (this option is also selected if you are offering a trial)
- Recurring Price: 97.00 (set your recurring price for the all recurring cycles)
- Trial Price: 0.00 (Set to 0.00 or leave this field empty if you don’t want to include a trial price for your product. If you want to include trial or initial price, set the amount here ex. 7.00)
- Recurring count: 9999 (Set 9999 if you want unlimited recurring cycles until the customer cancel. If you want 6 recurring cycles with 7 days trial, put here 6 and in Recurring Cycle #1 put 7. If you want 6 recurring cycles with 30 days trial, put here 5 and in Recurring Cycle #1 put 30. If you want 6 recurring cycles with no trial, put there 5 and in Recurring Cycle #1 put 30)
- Subsequent Recurring Cycles: 30 (Here put the number of days before each subsequent billing)
- Save Product and move to the Notifications tab.
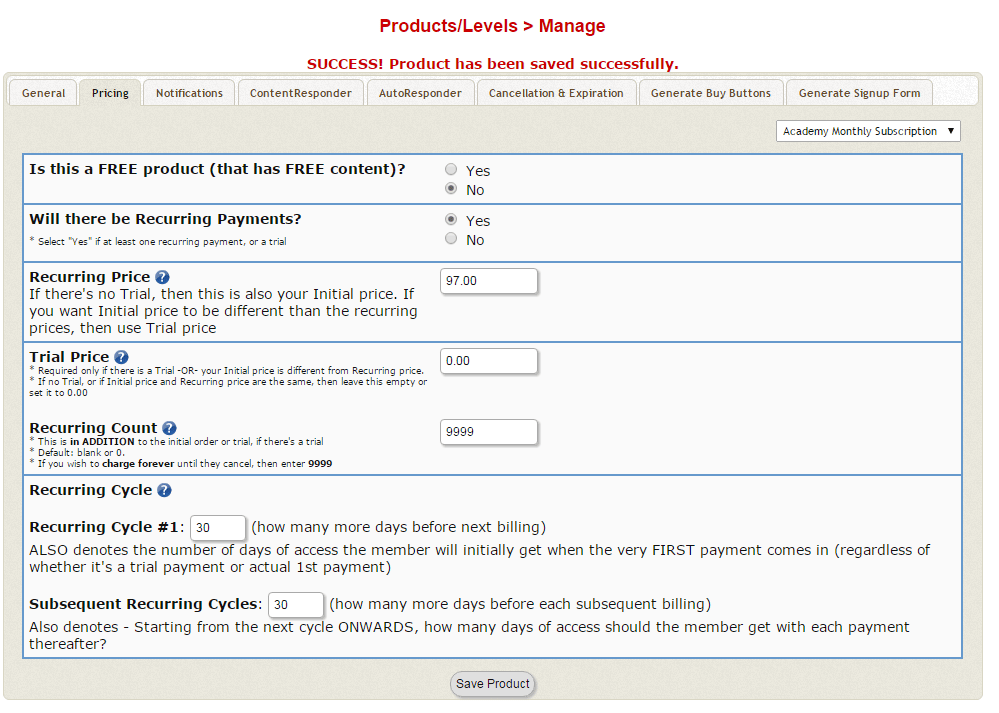
Figure 4. Pricing options for our recurring product in DAP
Notifications Settings
On the Notifications tab, you can customize your email message with the Available Merge Tags. If you are using third party autoresponder like AWeber, then leave both emails here completely empty.
If you are using the email system from DAP, customize only the first Welcome Email. The Double-Optin Email is NOT required in our case because our product is not FREE. Leave these fields (subject and body) empty.
Save the product and move to ContentResponder tab.

Figure 5. Configuring the email Notifications
ContentReponder Settings
On the ContentResponder tab, we need to choose which pages we will be protecting for our recurring product. From the left panel (Available Content) you can select the pages that need to be protected.
Note: If you are protecting a parent page here, its child pages WON’T be protected with DAP. You need to protect manually the child pages one by one.
If you want to protect a whole category, then you need to put the URL of the category in the Protect a URL field.

Figure 6. Protecting post or pages in DAP
Protect Files In DAP
When it comes to the files, you can look after a folder and file directly. Generally, the protection works really good for the purpose of restricting people from sharing your product links. They will be pass on the No Entree Page if they do not have the right to see the product.
So, to protect a file with Digital Access Pass you can put the URL of your file in the Protect a URL field, such as: https://webmaxformance.com/academy/membership-blueprint.pdf
But there is an easy way to protect multiple files stored in a folder on your server, by entering the name of the folder (root level) in Protect Files On Your Server field. If there are some errors, put the wp-content name here and navigate to your folder with the files that need to be protected.
Drip Content With DAP
Content dripping is one of the best features of DAP; it allows you to schedule your content for accessing after purchasing your product.
Let’s take an example, you own a marketing tips membership site where you publish one article each day for your members. You can also organize your website to make it visible a new tip every single day as compared to altogether. So you can do like that that write 200 articles and then schedule it to display a new one every single day for the rest 99 days.
Now, once you’ve protected your posts/pages/files you can set the Drip on them, that is as we said, after how many days the selected post/page/file will be available to your subscribers.
Click on the Edit icon next to the protected content. You will notice the Drip Settings below. From here you can choose after how many days this content will be available to your subscribers. If you want your page to be available after 7 days from the subscription, put Start Day #7. If you want the access to this page to be completely removed after 30 days, put End Day #30. If you want your protected page to be forever accessible after the Drip period, then put End Day #9999.
You can limit the access to your page, post or file according to the number of clicks. So let’s say you want your PDF file to be accessible to only 100 clicks (100 downloads), so put # of Clicks: 100.
Another option is to Drip your protected content for a specific date. Just select the start and end date from the calendar buttons and you are good to go.
Click on Save/Update Resource and Save Product. Move to the AutoResponder tab.

Figure 7. Drip content in Digital Access Pass
AutoResponder Settings
On the AutoResponder tab, you can add the emails that you want DAP to send automatically to your subscribers. By default there is the Thank You For Your Purchase mail that you need to edit it with your personal message (by clicking on the edit button next to this mail under the Available Emails).
By clicking on the edit button next to the mail under Assigned Emails, you can set on what day you want this mail to be sent to your subscribers (put 1 for immediate sending, 2 for after 2 days… etc)
If you are using third party autoresponder then there is no need to add email series here.

Figure 8. Autoresponder in DAP
Remember: Digital Access Pass in not an email service! They don’t have their own built-in autoresponder since the plugin is using your server resources (your cPanel cron) which can be a great disadvantage (harmful to your server) if you are sending a lot of emails.
That’s why we advise you to use third party autoresponder.
Cancellation & Expiration
With Digital Access Pass you can choose what message will be shown to your subscriber’s profile page (My Content page) after their subscription ends.
On the Cancellation & Expiration tab, there is an option to put the Renewal HTML code that will show on the My Content page after the subscription ends.
Here’s our example code:
<h2 style="color:red">EXPIRED<h2>
<h3>Your access to this product has expired.
Please <a href="https://webmaxformance.com/academy/">click here to renew</a>.</h3>
In Post-Expiry Renewal Redirect URL put the URL to which a user is redirected to after their product expires.
Choose Expiration Action: Remove From Product.
Click Save Product and move to Generate Buy Buttons tab.
Generate Buy Buttons
First, you need to press: Click here to generate buy buttons for this product.
Depending on which payment processor you will be using, the different buy buttons you need to generate.
We will go simple and on this step, we will be using PayPal Standard for our button. Follow the provided steps:
- Enable Paypal IPN (from your PayPal account)
- Setup Paypal Business Email Id (from the Settings)
- Setup Paypal Identity Token (from the Settings)
- Generate Buy-Button (using the options below)
When you are done click on Generate Button Code.
Copy the code and put it to your landing page in the Text editor. This will generate simple Paypal button.
![]()
If you have your own button designed, just copy the Generated Payment Link and make your button clickable with this link.
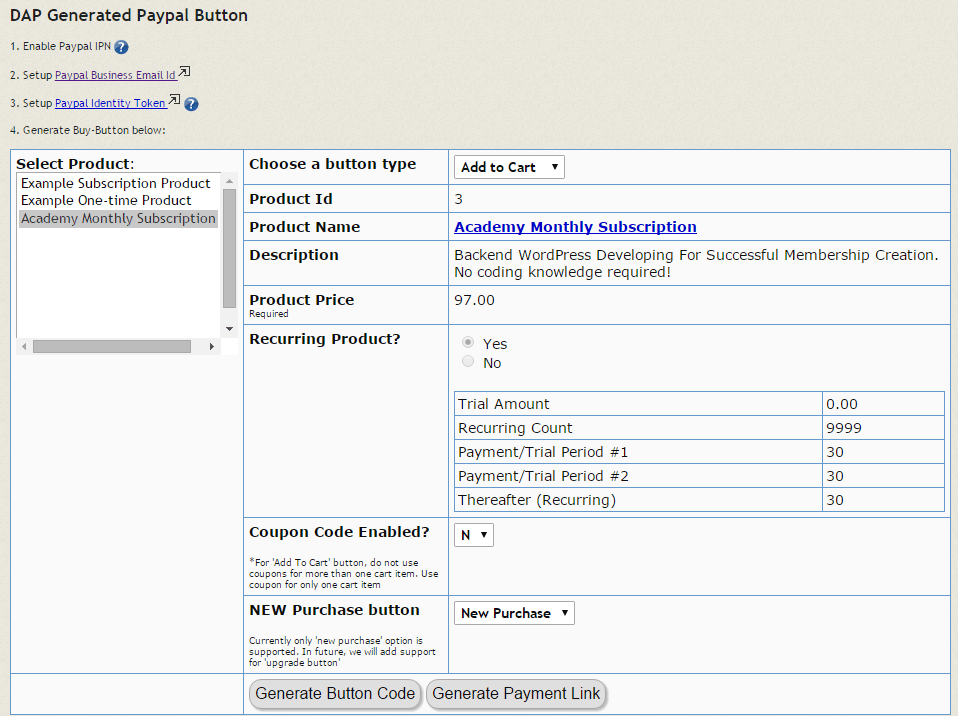
Figure 9. Customizing DAP order button
We cannot cover here all payment processors and creating order button for each individually, that’s why we advise you to follow their official documentation for creating order button with your preferred payment processor.
Generate Signup Form
Digital Access Pass even allows you to use their simple sign-up form (opt-in box) ONLY if you allowed free signup in the General tab. On this tab there are 2 options:
- Generate “Free Signup” Form Code
- Generate “Free Signup” Form Code with Coupon Field
By clicking on either of them, the code will be generated and you can put it in the Text editor of your page or in the Text widget of your sidebar.
But the design of DAP opt-in box is very very simple, that’s why we advise you using a more professional design from the sign-up form of your third party autoresponder.

Figure 10. DAP opt-in box frontend
By concluding this step we are done configuring our recurring product.
The procedure for the one-time product is more simple for configuration, that’s why we won’t get into many details here.
- In the General tab select Example One-time Product.
- Press Save As New -> OK.
- Put your product info like we’ve shown previously for the recurring product (Figure 3).
- In the Pricing tab choose Is this a FREE product: NO
- Will there be Recurring Payments: NO
- Put your full price, ex. 1347.00
- Membership Duration: 9999 (for unlimited)
- Save Product

Figure 11. Configuring the price for our one-time payment product
The other configurations of the rest of the tabs are the same.
Manage Your Users In DAP
In the Users section, you can make all standard manipulations with your users. You can:
- Manage your users (filtering, giving them access to your products, exporting etc)
- Add new users (this option can be used to manually add a new user if he/she paid offline for your product)
- Add new custom fields to the users

Figure 12. Managing users in DAP
Affiliate System In Digital Access Pass
DAP offers a great affiliate system along with the detailed reporting. With DAP you don’t have to include, purchase, and add any extra plugin or software for creating an affiliate system.
If you want to skyrocket your earnings from your product(s), then we HIGHLY recommend using the DAP affiliate system where you will give some commission to your affiliates who promote your product(s).
Otherwise, if you are NOT using the affiliate system, you will be leaving money on the table.
Navigate to your DAP Dashboard -> Affiliate -> Commissions. Here you can decide what kind of incentive you will be giving to your affiliates who successfully promoted your product. We recommend to decide between giving cash per lead, per sale (fixed) or per sale (percentage). For example, we will be giving 20% of the full price for those who successfully promoted our product.
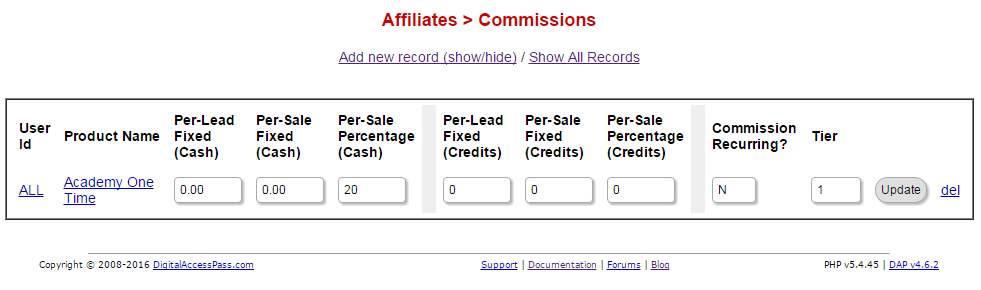
Figure 13. Configuring commissions for our affiliates
But DAP doesn’t allow directly making any affiliate payments to your affiliates. Follow their official documentation for paying your affiliates.
Various Payment Choices and Shopping Carts In DAP
DAP is compatible with the several payment processors and shopping carts. Now, they are constantly adding more options. They are also packed with the in-built shopping cart so clients don’t have to leave their site to pay the charges for the product.
All supported payment options in DAP:
- Stripe
- Authorize.net
- Google Checkout
- Digiresults
- e-Junkie
- Paypal Website Payments Pro
- JVZoo
- Plimus
- WorldPay
- Zaxaa
- Paypal Standard
- DealGuardian
- ClickBank
- 2Checkout.com
- WSO Pro (Warrior Plus)
Maintained shopping carts:
- 1SiteAutomation.com
- InfusionSoft
- Premium Web Cart and
- WP eStore.
By going to Payments -> Order you can search for all orders (transactions) by date, by product, email etc.
By going to Payments -> Generate Buy Buttons you have to spare some minutes to create buttons (we only showed for Paypal Standard, you need to check their documentation for other buttons), set up the processor for your payment and your shopping carts but after that it is simple yet straight forward. If you want to use the shopping cart of DAP, you are permitted to create upsells & down sells easily for your products without the necessity for the shopping carts of the third party.

Figure 14. Generating buy button with DAP shopping cart
Another thing you need to configure before putting your product for sale is Payments -> Cart Options.
On this step, you need to select your product and decide what you want to be included on the checkout page for this product. We advise you to keep it simple and not to scare your buyers with too many fields (unless necessary).
Coupon system
You can enjoy the standard coupon system feature here for easily setting the prices and giving incentives to appropriate products. To set a coupon, go to Payments -> Coupons.
- Add the coupon name in UPPERCASE such as: EASTER10
- Give a brief description for the coupon such as: Giving 10% OFF the main price.
- Put the Discount Amount such as: 134.00. The discount must be in the actual amount of dollars (not in percentages).
- If your product is Recurring, put the recurring discount that will be applied to the recurring payment cycle.
- Manually enter the start and end date for which this coupon will be applicable.
- Put the maximum number of usage for this coupon (9999 for unlimited).
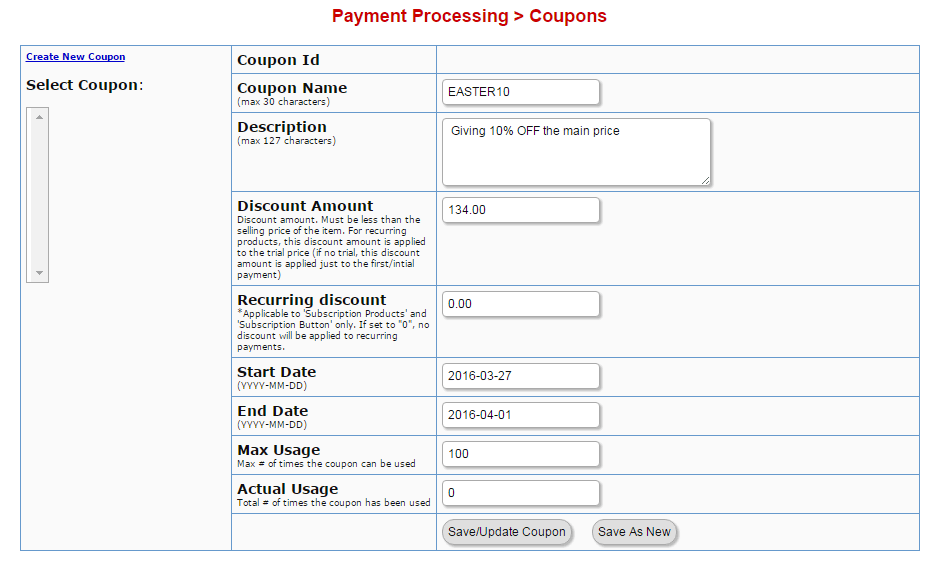
Figure 15. Configuring the coupon in DAP
Now associate the coupon with your product and press Activate Product/Coupon.

Figure 16. Connecting the created coupon with the product
You are done configuring the coupon.
Now make sure to include the Coupon field on the checkout page of your product, Payments -> Cart Options -> Show “Coupon Code” -> Y.
Dime Sales
Configuring a dime sale allows you to automatically raise the price of your product as sales are made. You can skyrocket your profits with this selling tactics since it will create an instant urgency for impulsive buying of your product.
You can implement this tactic in DAP by going to Payments -> Dime Sales. You can implement it ONLY if you are using PayPal as payment processor.
- First, select your product from the left.
- Timed Pricing -> Yes
- Put the start date for the dime sales.
- Put the price increment, that is, how much you want the price of your product to increase.
- Put the maximum amount of the price to which the dime sales will go.
- Set to increase the price with every number of sales or number of days.
- Save/Update
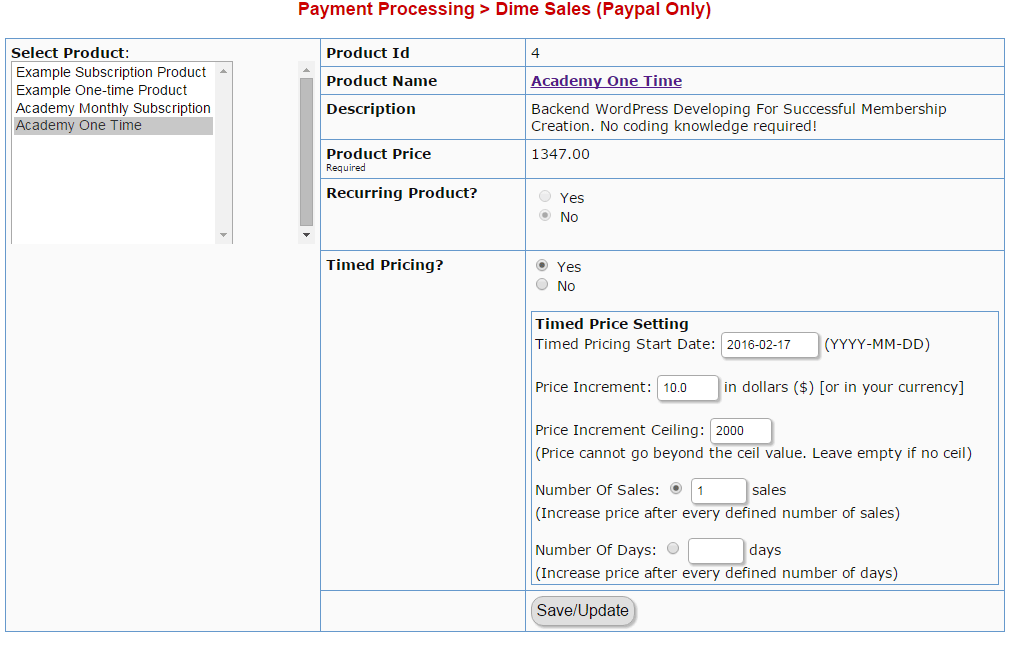
Figure 17. Dime sales in DAP
DAP Setup Configurations
The main setup configurations that need to be done in DAP (Setup -> Config) are pretty straightforward. The essential configurations like the General settings include putting your valid DAP license key, site name, basic email info etc.
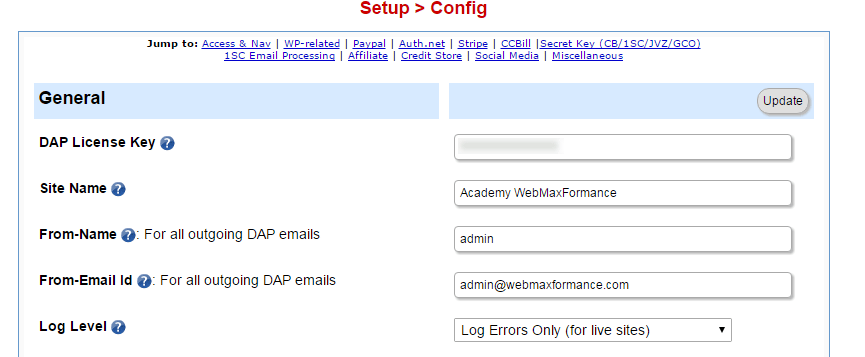
Figure 18. Basic settings configuration
The configurations below (Access & Navigation and WordPress Related) are good as they are by default, they don’t need further configuring unless you specifically need to.
The other configurations depend on which payment processor and cart you will be using, so you need to put their APIs accordingly.
With that being said, you are done creating your membership site with Digital Access Pass.
All About The DAP Support
DAP has a specific section for the extension documentation, which you can easily use for every small problem you may stumble upon. It covers pretty much everything. Also, some videos are available for the basic setup and installation choices. For other else, you have written tutorials from the official documentation.
Apart from the extensive documentation section, a forum section is also available which can help you to solve few questions.
If you are facing the troubleshooting and error problem, then you don’t need to worry because there is a ticket system which is packed with the good response time. We have personally used it a few times to solve some problems. This support is available with the annual site license.
Apart from all these, DAP also offers video support and premium phone but for this you have to pay extra $50. However, we at Academy Webmaxformance can help you if you have any further questions that are beyond the scope of this tutorial, so no need for further unnecessary payments.
Pros And Cons
| Pros | Cons |
|
|
Final Words
We like the design of the DAPadmin area because it looks updated and very different from the usual area of WordPress admin.
The design of the member pages, checkout pages, and shopping cart are also great and they are constantly improving it.
The other thing is that you have to design and create the member’s area with the help of the shortcodes and page creation. The design is typical like other page designs. All these pages take in the product download, profile, affiliate pages, and some others.
To conclude, DAP is honestly one of the best membership software on the market because it is packed with almost everything you need for successful membership, saving you a lot of troubles concerning paying any extra plugins or add-ons. This membership plugin was one of our favorite plugins for membership creating, along with Zaxaa Member.
When it comes to the price, we must admit that it is little expensive, but it is packed with any kind of features so if you are building a serious online business, we think that it is really worth it.