By now you surely figured out that as a webmaster you have to keep your eyes always open when it comes to the security of your website. Prevention is always better than the cure, so we will go to extensive lengths here to help you get prevented from possible future attacks on your site.
Also, we will tell you what to do in case you’ve been already hacked. Our today’s article will be a great precaution measure for your website’s security. So there will be no room for panic when dealing with hackers’ attacks and achieve TOP level security for your site.
To start with, we assume that you are a non-technical user, as many of our clients are. So our mission was how to help such non-technical user to protect his website on his own, by making it highly secured like those high-profile companies out there.
Along our way of extensive Academy Lab researches, for WordPress security, we landed into Sucury WordPress plugin, which pretty much satisfied our requirements for TOP security plugin for 2016 (which is free by the way).
We put a lot of effort to fully test this plugin on our websites and provide an unbiased review with all of Sucuri’s bells and whistles. These were our results.
How Sucuri Security WordPress Plugin Passed Our Audition For TOP Security Plugin For 2017?
We are somewhat BRUTAL when making these kinds of reviews. We try to cover every possible angle on what one security plugin need to provide for considering a MUST HAVE plugin. If you read our main lesson for making your WP website hacker-proof, by now you may have a fair idea what security features are essential for preventing your site being hacked. Mainly that’s our criteria for selecting the best WordPress security plugin, but now let’s see what Sucuri’s provides.
Sucuri Installation And Configuration
Install the Sucuri plugin by navigating to your WordPress Dashboard -> Plugins -> Add New -> Search for Sucuri.
From the blue notification bar click on Generate API key.

Figure 1. Get free API key
If your API key is not activated automatically, open your email, get the API key from there and put it in the corresponding field.

Figure 2. Basic API key configuration
Now click the Dashboard and we can start configuring the plugin.

Figure 3. Sucuri settings
We think that Sucuri team is very capable when it comes to monitoring your website. In short, these guys can save your “rainy day” when your site is at risk.
When you first enter the Sucuri Security Dashboard, you will see all kinds of logs and reports that you need to monitor closely if you suspect your site is at risk from some security threats. At the Sucuri Dashboard you can find only the logs of your website but, at the next step, you can do a lot more than just looking at potential threats.
Malware Scan
The Sucuri Security site check scanner (located in Sucuri Security -> Malware Scan) makes in-depth scans for your website to ensure it is clean for:
- known malware
- blacklisting status
- suspicious redirects
- website errors
- link injections
- out-of-date software, etc.
But that’s not all. The security Sucuri Security Scanner also ensures that your website is not blacklisted by Google, Opera, Norton, Bitdefender, ESET, SiteAdvisor and many more.

Figure 4. Sucuri Security scanner ensures that your website is not blacklisted by search engines and antiviruses
This is of great importance for keeping your website’s reputation intact and preventing your audience from seeing those nasty signs:
- “Warning Something is Not Right Here.”
- “Reported Attack Page”
- “The site ahead contains malware.”
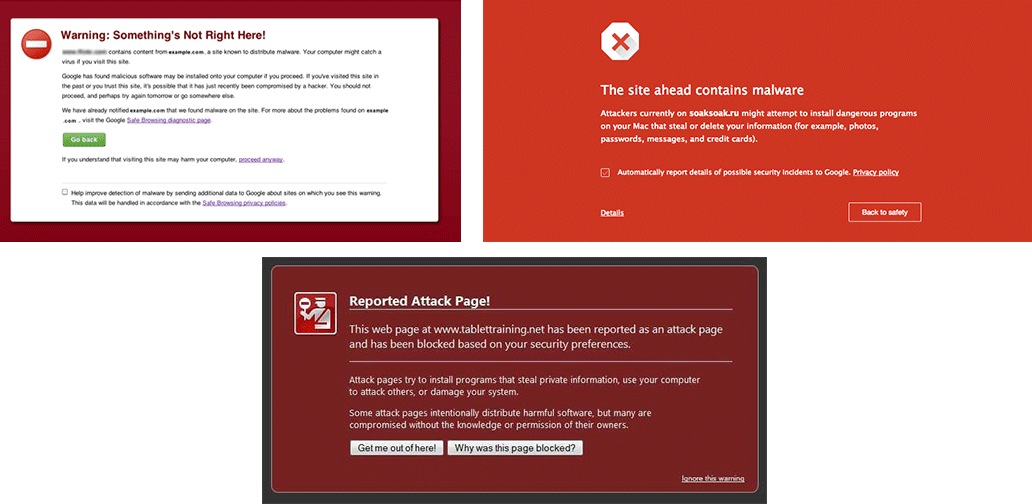
Figure 5. Examples of reported attack pages
Scheduling The Security Scans
What is great about this plugin (an option that very few security plugins provide) is setting automatic scans for your website. Instead of manually scanning your website every time, you can set the frequency with which the scanner runs its tests for all kinds of threads. The frequency can be scheduled as quick as scanning on every 3 hours, twice daily or once daily. You can find and set this option by going Sucuri Security -> Settings -> Scanner. We will come back on this step later.

Figure 6. Scheduling the scanner
Firewall WAF – Sucuri Security Firewall (PRO)
If you want to have a complete security peace of mind, then we recommend using their CloudProxy Service. It is paid option also, starting from $10/month for a single website. By activating this service, you will enable their powerful Firewall, which will act as a strong shield, protecting your site from malware, DDoS attacks, SQL injection attempts, brute force attacks, XSS, RFI, backdoors and many other threats to your site. In return, you will gain a great benefit of improved site performance for your audience.

Figure 7. Using Paid Sucuri Security CloudProxy Service
Features covered with the Cloud Proxy Service:
- Restricting the admin panel only to Whitelisted IP addresses. Block everyone from accessing your /wp-admin area.
- Security Headers. Protect your site from clickjacking and XXS attacks.
- Blocking of XMLRPC, Comments, and Trackbacks. If you’re using Facebook or Disqus comments, you can block all other forms of commenting, brilliant for blocking spam.
- Preventing unfiltered HTML to be sent to your site. Blocking unfiltered HTML content to be sent to your site (including Iframes and Java scripts)
- Prevent the upload PHP or executable content.
- Advanced evasion and intrusion detection system.
- Enable Emergency DDoS protection. The actual rescue if you’re under attack and need protection fast.
- Blocking proxies from the top 3 attack countries (China, Russia, and Turkey).
Hardening – One-Click Hardening
This is what we meant at the beginning when we mentioned non-technical users. Now everyone can secure their website without any special technical knowledge. This section makes it easier to secure your website for all Sucuri users. The first feature is to harden your website with the Website Firewall (WAF) that we’ve mentioned previously (the paid option).
Below, you can see the Harden button for each particular security measurement. Click on every Harden button until all of the features are hardened.
One-Click hardening section covers the following security precautions:
- Website Firewall protection – We talked about this in the previous step. You need to buy their CloudProxy Service for this kind of hardening your website.
- Verifying WordPress version – Always keep your WP installation up to date!
- Verify PHP version – Check if you have the latest version of PHP installed.
- Remove WordPress version – You figured by now that the hacker can target your website just by using the WordPress version. The very good idea is to hide it!

Figure 8. Secure your website with one-click hardening
- Protect uploads directory – The hackers always try to exploit a vulnerability in a plugin or theme. That’s why you need to keep this directory protected.
- Restrict wp-content access – By hardening your WP site with this option, you are blocking the direct access to any PHP file located under the wp-content directory of your site.
- Restrict wp-includes access – Blocking direct access to the PHP files inside wp-includes directory.
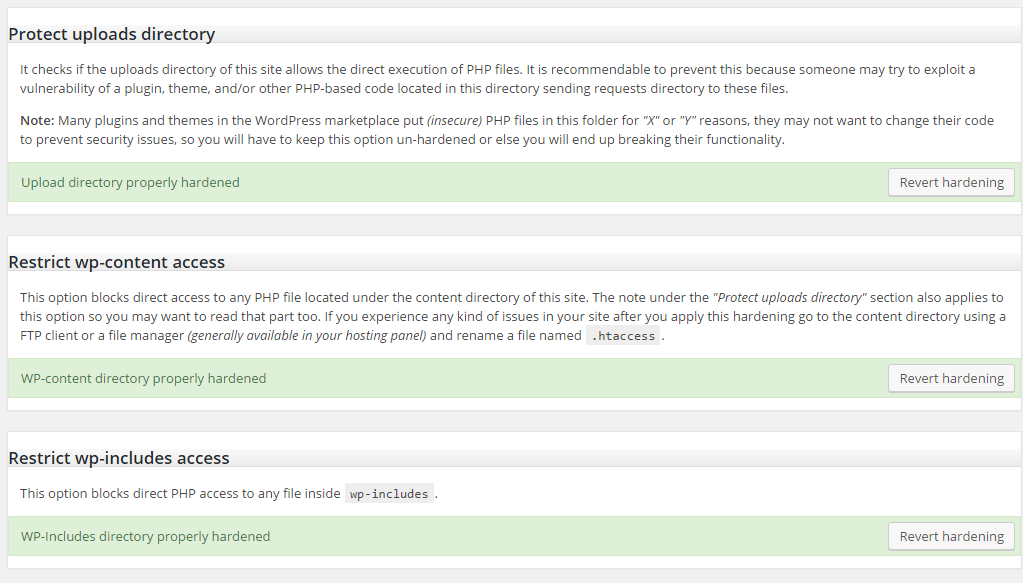
Figure 9. Harden your WordPress site with important security measurements
- Security keys – It is of great importance to have proper random keys/salts created in your WordPress installation. They will make your site harder to hack.
- Information leakage (readme.html) – It checks whether you have the readme.html file available that leaks your WordPress version.
- Default admin account – It checks whether you have the default admin user enabled. If you have, then wait no more and go to Users -> Add New. Create new admin user with a different username, delete the default “admin” profile and transfer all content to the new admin.

Figure 10. Sucuri Security more hardening features
- Plugin & Theme Editor – This option serves you to prevent users from being able to edit sensitive files from your WP dashboard and potentially crash the site.
- Database table prefix – It is crucial to have your database table prefix changed from the default wp_
- Error logs

Figure 11. The last Sucuri Security hardening features
Post-Hack
Another security measurement for recovering from the damage of the actual hacking. This step has 4 essential sections:
- Security Keys (which allows you to generate new security keys for ensuring better encryption of information stored in the user’s cookies).
- Reset User’s Password (which enables you to reset the password of any user you like).
- Reset Plugins (which allows you to re-install all the plugins installed on your site if you suspect an infection or malicious code).
- Available Updates (where you can check which plugin or theme needs an update)
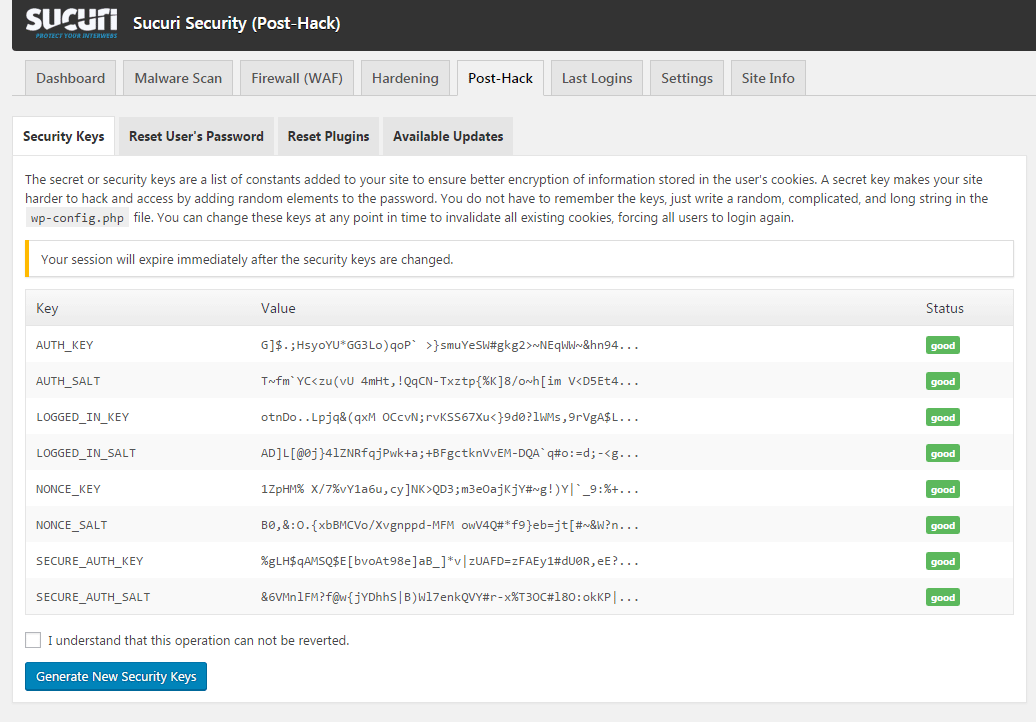
Figure 12. Recover the damage from the actual hacking of your WP site
Last Logins
From this section, you can monitor all the users that logged in your WP dashboard and from which IP.

Figure 13. Monitor all the users that logged into your WP dashboard
Settings
The settings tab consists of many sub-tabs. Each sub-tab has even more options.

Figure 14. Sucuri general settings
General Settings
The options at the General Tab are pretty self-explanatory and most of the times you won’t be needing to change some settings here. Here are all the features on the General Settings tab:
- Plugin API Key – The Sucuri plugin requires an API key for communicating with the Sucuri services. If you are using the free version, then the API key is automatically generated for you.
- Data Storage Path – This is the default directory where the Sucuri plugin will store the security logs. You can change it if you want, but it’s not necessary.
- Reverse Proxy and IP Address – Advanced (not necessary) option that allows the plugin to go through a list of common HTTP headers to retrieve the real IP address of the origin of the requests.
- IP Address Discoverer – This feature will use DNS lookups to automatically detect if the website is behind CloudProxy in which case will modify the global server variable to set the real IP of the website’s visitors. It’s recommended to Disable this option since it may slow down your website especially if your hosting relies on slow DNS servers.
- API Communication via Proxy
- API Request and SSL – If you have SSL on your site, then you can configure it from here.
- Failed Login Password Collector – This option must be used with great precaution because it will also log the attempts that you (as a legitimate user) send, if by mistake you mistype a character in the password the plugin will log this and it will be sent to the Sucuri servers.
- User Comment Monitor – You don’t need this feature since we will be using different mechanisms for preventing spam comments.
- XML HTTP Request Monitor – It is possible that the response time of your website gets affected after the activation of this option, so leave it Disabled.
- Audit Log Statistics – Enabling this option allows you to have a quick view of the range of the activity of your users and/or the attacks directed against your website. By default, the plugin uses the latest 500 entries in the audit logs. Here you can put Audit Logs Limit: 500 and click Save.

Figure 15. Sucuri audit logs
- Date & Time is good by its defaults.
- Reset Options – This action will delete all the entries inserted by the plugin in the options table of the current database, including the API key. You don’t need to mess with this option now.
Settings -> Scanner
We’ve already mentioned this tab in Step 3: Website Monitoring And Scanning. From here all you need to change (if you want, of course) is:
- Scanning Algorithm – a method that will be used to read the directories and files contained in the project when any of the file system scanners is executed. Three scanning algorithms available: SPL (Standard PHP Library) – high performance, Open Dir – medium performance, Glob – low performance. The best option is to leave the default SPL.
- Scanning frequency – every 3 hours, twice daily (every 12 hours), once daily (every 24 hours) and never. This depends on your current site risk.
The remaining options you don’t need to touch at this point.

Figure 16. Options in the Sucuri Security Scanner Settings dashboard
Alerts
This is probably the most important part of Sucuri monitoring. If the monitoring system detects something on your website, you are immediately notified. Sucuri offers you to configure email alerts, Twitter alerts, IM alerts, SMS alerts, and RSS alerts. It is great because if there is ever a hack, you will be the first to know. They also have monitoring for DNS changes, whois changes, etc. You can even add other recipients that will be alerted about the status of the monitoring.
The default settings are just okay for now.

Figure 17. Get notification when monitoring system detects something on your website
We will skip the API Service and Log Exporter at this point, because these features are not of big importance for now.
Ignore Scanning
This option serves you to force the plugin to ignore specific files during the file system scans by adding the absolute path of the file or symbolic link that you want to skip. This is useful if your project has too many directories or files it may cause the file system scanners to fail.

Figure 18. Ignore specific files during the file system scans
Ignore Alerts
Here you have a list of registered Post Types. Since you have enabled the email alerts for new or modified content, Sucuri Security will send you an alert if any of these post types is created or updated. You may want to ignore some of them if you want.

Figure 19. Ignore alerts
Trust IP
This option allows you to force the plugin to stop sending email notifications about actions executed from trusted IP addresses.
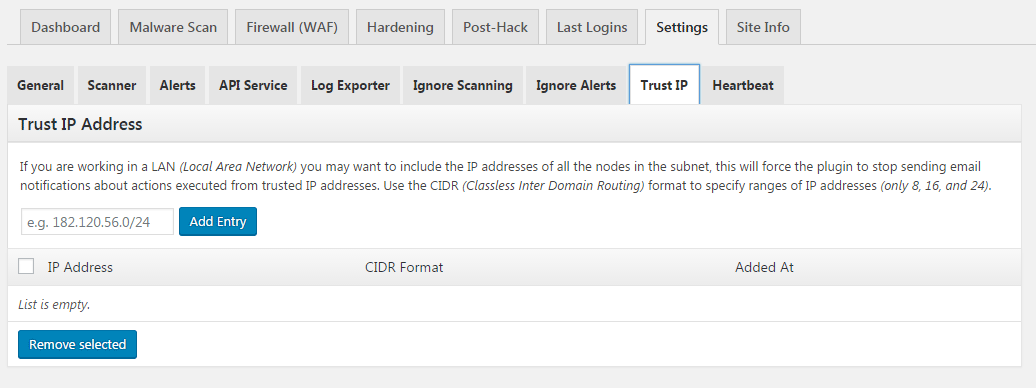
Figure 20. Choose to stop sending email notifications about actions executed from trusted IP addresses
Heartbeat
The Heartbeat option is used for autosave, post locking, and log-in expiration warning while a user is writing or editing. You can change the Pulse Interval here to run every 60 seconds in order to not burden your server resources unnecessary.

Figure 21. Make autosave, post lock, and log-in expiration warning while a user is writing or editing
Site Info
At this tab, you will find all the information regarding your website and the server.
The sub-tabs allows you to view the specific information like:
- Plugin & Server Info
- Scheduled Tasks
- Access File Integrity
- Config. Variables
- Error Logs

Figure 22. Information regarding your website and the server
Server Side Scanning (PRO)
You’ve scanned your website with the regular free scanner, and nothing comes up. But what if the sneaky hacker who gained access to your site doesn’t care about infecting your website with malware (which most hackers probably don’t)? What if your hacker wants to harm your revenues and reverse your affiliate links from the older posts to a hacker’s its own? Or maybe send spam emails from your server. There is no way you can detect that kind of activity with the regular scanner.
That’s why the guys from Sucuri Security gone a step further and implement their Server Side Scanning option. This is paid option and what it does is scanning your server to make sure there are NOT any suspicious files that are being injected to your server. It only takes uploading a simple PHP file and taking control over your website. That’s why with the Server Side Scanning option you can audit events like file changes and prevent the attack on time.
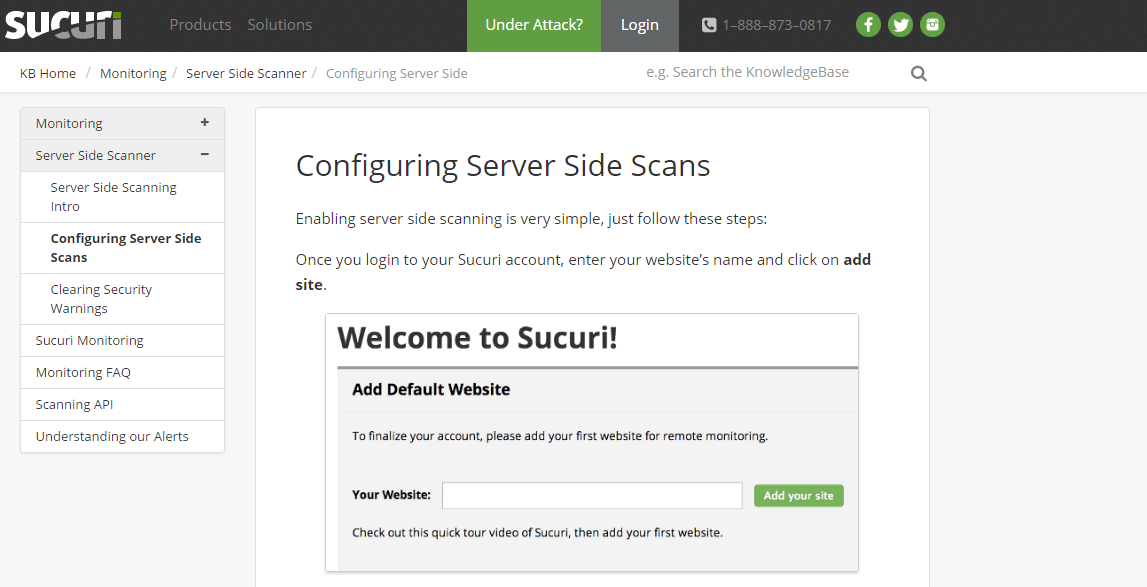
Figure 23. Configuring server options
Sucuri Online Scanner
Sucuri even has an online scanner that can help you to scan your complete website and give you a basic overview of its status. In addition, it will provide possible fixes for the issues found.
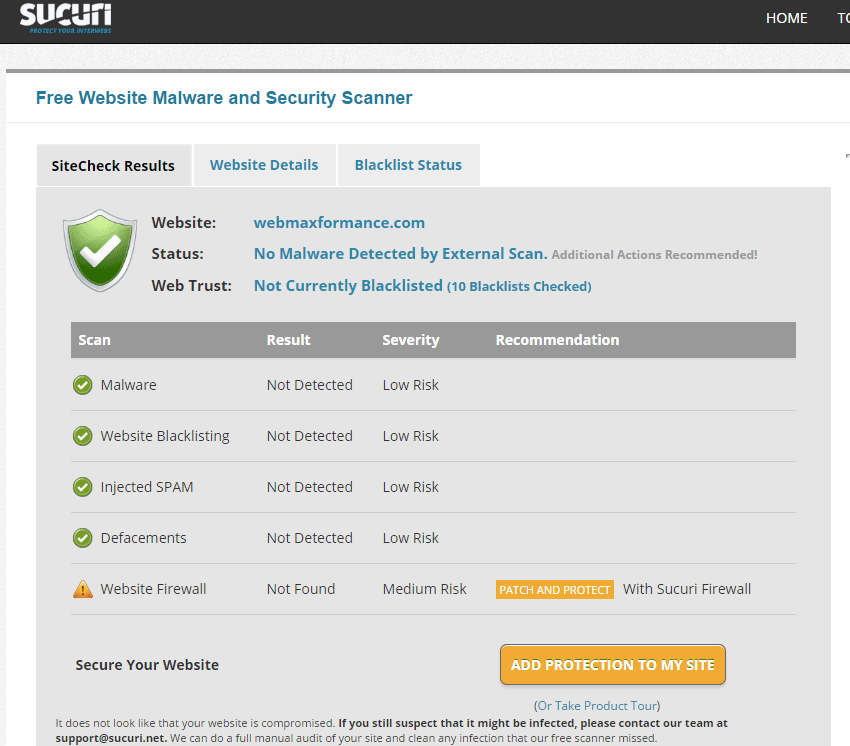
Figure 24. Online scanner sucuri
Sucuri Security Pros And Cons
| Pros | Cons |
|
|
Final Words
The Sucuri team take the security of your website very seriously. Their plugin will clean up your site if it has been hacked; it will remove the malware and solve all on-site issues like blacklisting. They will also create regular backups if the damage to your site is irreversible. The bad news is that will cost you. But taken into consideration what everything you will get from the Sucuri team to have a security peace of mind, it will worth every dollar you spend.
We know that the web can be a scary place. The free version of the plugin will give a really nice security for your website, but if you can afford the TOP level security that the premium versions of Sucury plugin provide, you can sleep much better because you are in right hands.