WordPress is one of the biggest website content management systems in the world. Everyone from small-time bloggers to multi-million dollar companies, makes use of WordPress. Yet very few people know of the incredible and powerful plugin that’s also used by millions: Jetpack.
In this lesson will teach you some of the key benefits of using Jetpack for your WordPress site or blog. We will give you an overview of the plugin, the basic configuration and we will briefly cover its main features.
Introduction To Jetpack
Created by the WordPress team, it adds a huge amount of functionality to your WordPress installation. It adds the power of WordPress.com to your website. That’s why it is of great importance to install the Jetpack plugin immediately after your WP installation.
It has literally tens, if not hundreds of features, and so we’ll talk about some of the more popular and useful additions to your marketing and analytic arsenal.
Basic Configuration Of Jetpack (Part 1)
- First, you need to go to WordPress.com and register a site or blog for free (if you didn’t have such site by now).

Figure 1. Creating free website at WordPress.com
- Choose what kind of website you are creating
- Select one of the provided designs
- Choose your domain such as www.wmfacademy.wordpress.com
- Select the free plan
- Enter your email, username, and password
- You are done
On this free domain, you can connect as many hosted WordPress sites as you want. If you have any kind of website registered on WordPress.com, then skip all steps above and move to the part 2 of the configuration.
Basic Configuration Of Jetpack (Part 2)
- Install the Jetpack plugin just like any other plugin from the WordPress plugin repository (Plugins -> Add New). You will see it right in the first row of the recommended plugins.
- The notification box will appear asking you to connect your site with WordPress.com

Figure 2. Connecting your hosted WP site with WordPress.com
- The oAuth mechanism will appear asking you to Approve the access to your WordPress.com account. Wait a few seconds and you are done connecting the Jetpack plugin with your WP account.

Figure 3. oAuth mechanism for Approving the access to your WP account
What We Like Most About Jetpack
Jetpack consist of many features that can be found as separate plugins. But having too many plugins can lower the performance of your site, can create some plugin conflicts and in worst case scenario, your site can crash. Jetpack has a solution to this problem since the plugin itself consists of almost every necessary feature needed for properly configured WP site.
Speaking of performance, with Jetpack, all of your images will be hosted on WordPress.com servers so that you will gain faster website loading.
Statistics
Perhaps the biggest advantage of Jetpack is the site statistics feature. This feature will allow you to see the number of visitors your site is getting on a daily, weekly and monthly basis. Also, it will tell you how well each post and each page is performing. It’s fantastic for letting you know how well you’re doing.
It’s like a more comprehensive version of Google analytics that comes straight from the source – your WordPress installation.

Figure 4. Statistics In Jetpack
Jetpack Settings
By navigating to Jetpack -> Settings you can set some great features for your site. The features are very handy if you’re a webmaster for multiple websites, or if your WordPress.com website has multiple hosted WordPress installations connected to it.
In the General tab, there are options for checking the connection with WordPress.com account, option for notifications (comments, likes, traffic on any site connected with the account) and option for secure JSON API connections.

Figure 5. Jetpack general settings
In the Engagement tab, there are many options for increasing the engagement to your site. In this tab:
- Site Stats should be enabled, it allows you to see the traffic on your website from your WP dashboard.
- Sharing can be disabled (we will implement a different plugin for sharing later in our Academy).
- Publicize feature is for posting on connected social media accounts when you write a new blog post.
- Related post feature allows you to show related posts under each post from your blog.
- Comments feature should be off, we will implement a different mechanism for commenting in the later lessons.
- Likes and subscriptions can be off.
- Gravatar Hovercards is good by default.
- Sitemaps feature need to be on (although we will set the sitemap later in the Tracking section of the Academy)
- Enhanced Distribution and Site Verification can be turned off, we don’t need them at this point.

Figure 6. Jetpack engagement settings
In the Security tab, these features need to be ON:
- Protect – helps you to protect your website from hacking login attempts (we will increase this feature by implementing a powerful Security plugin later in the Security section.)
- Monitor – gives you immediate notifications when your site goes down.
- Single Sign On – you can log in with your WordPress account.
- Other features for a security of your website, will be covered later in Security and Backup sections (you don’t need to pay anything here!)
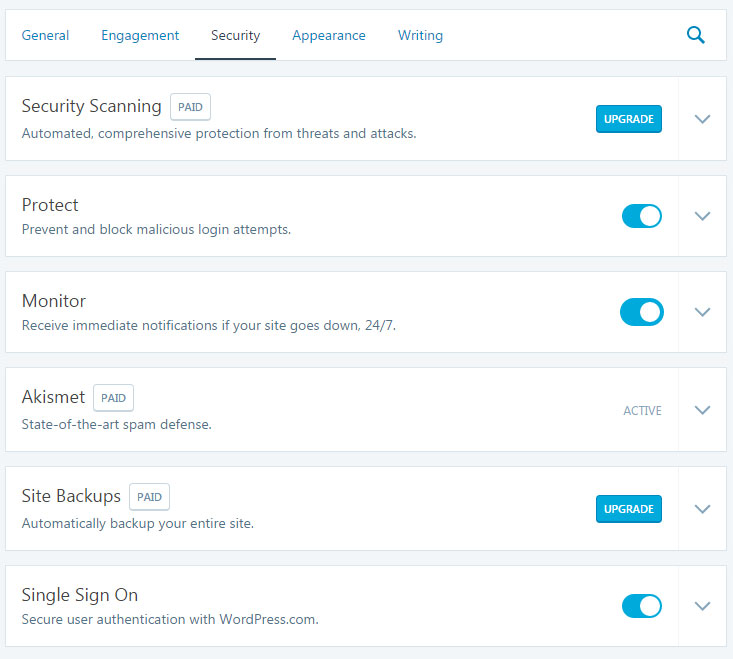
Figure 7. Jetpack security
In the Appearance tab, you can make some changes such as:
- Tiled Galleries can be OFF.
- Photon feature should be ON. This is a great feature that puts your images on WordPress CDN servers hence speeding up your website.
- Carousel – you can turn this feature off, we won’t be needing this.
- Extra Sidebar Widgets – is a useful feature for managing your sidebars.
- Widget Visibility – can be ON in case you want some sidebars to appear on specific posts/pages.
- Custom CSS feature is usually OFF because this feature is handled by the custom CSS of the theme you will choose.
- Leave the other features off.

Figure 8. Jetpack appearance settings
In Writing tab, you can set the following features:
- WP.me Shortlinks can be ON, because you can use the feature to shorten your post links.
- Shortcode Embeds – can be ON for easier embedding.
- Contact Forms – you can turn this feature OFF, we will configure more advanced contact form later in the Contact Forms section.
- Spelling and Grammar – it’s a good idea to leave this feature ON.
- You can turn OFF Markdown and Post By Email, we don’t need them at this point.
- Leave Beautiful Math and Custom Post Types as they are.

Figure 9. Jetpack writing settings
URL Shortening
When you set up your WordPress site, you’ll often find that your articles and posts can have really long titles in the internet address bar. For instance, they might be:
www.yoursite.com/year/month/date/category/post.php
This is great for functionality and search engine optimization. However, it’s terrible for other things, such as having people remember the link to your site and sharing it on their social media.
Jetpack allows for a shortened link which looks something more like:
https://wp.me/p7dQGp-zz
This allows you and your readers to share more easily. You can find the button Get Shortlink on your WP Editor.

Figure 10. Shortening the URL of your post
Sharing
As we mentioned, we will use a different plugin for sharing, but If you don’t want to use a specific plugin that allows your users to share your posts, then Jetpack provides you with a simple Sharing mechanism. You can allow this feature from the Jetpack Settings and go to WP Admin -> Settings -> Sharing for configuring the social networking sites. At this moment Jetpack provides sharing through the following media services:
- Google +1
- Digg
- Print and
- Emai

Figure 11. Sharing buttons in Jetpack
Related Posts
When the “Related Posts” feature is enabled, it automatically creates additional relevant links from your WP site under your posts. If you want featured image to appear as well, you need to go to WP Admin -> Settings -> Reading and check Use a large and visually striking layout.

Figure 12. Related posts created with Jetpack
Final Words
The best thing about Jetpack is that it is free to use most of its features. This makes it a zero cost way to turn your basic WordPress site into something far more powerful. In fact, many web developers would charge hundreds of dollars for the features that WordPress Jetpack provides for free.
We advise you NOT to start configuring your membership site UNTIL you connect the Jetpack plugin. Once you’ve connected it, you are ready to move to our next lesson.