Introduction To InstaBuilder
For those who are reading about this plugin for the first time, Instabuilder is a drag and drop page editor for WordPress. This simple plugin is so powerful because it is capable of creating high quality and professional sales and squeeze pages within five minutes! Below are some key features of this powerful plugin:
- In less than five minutes, this fantastic plugin will create a professional sales page, landing page, and squeeze page for you.
- Opt-in option for Facebook.
- Over 50 beautiful themes.
- Delayed content.
- Eye catching opt-in option.
- Sensitive against viral download.
- Split testing.
- Point and click Font style and graphics control.
- Integrated with auto-responder.
These features are excellent and sturdy, which you hardly will see in other plugins. The tools that come with Instabuilder are very beneficial.
Why You Need InstaBuilder
Now, you may still be skeptical about this powerful plugin, wondering why you should use it. To remove your doubts furthermore, below are solid reasons why you may want to choose this plugin. Internet marketers that make use of WordPress as their blogging platform and anyone who wants to sell something online actually needs this plugin. Especially if they are total beginners. InstaBuilder doesn’t only save time but also provides that high-tech professional design that you desire to make whooping sales.
Formerly, internet marketers only had two overall ways to work out issues concerning their web pages, sales pages and other pages needed to bring massive sales to their products. These options are:
- Theme solution (using Genesis Framework, Divi Theme, Sales Press Pro, Optimize Press, Authority Pro 2, etc.) and
- Non-theme solution using page-building plugins.
The issue, however, is that making use of themes in creating landing pages, sales or squeeze pages come with demerits because internet marketers don’t have the option to use the themes they desire, and they find it difficult to customize their websites. Because of these demerits, internet marketers have been yearning for a quick and efficient solution that is highly professional. These yearnings give rise to plugins such as InstaBuilder for performing all the tasks listed above at once.
InstaBuilder Installation
InstaBuilder is a premium page builder that costs from $77 (3-site licenses), $97 (unlimited domains you own) and $197 (unlimited domains for your clients). After your successful purchase, log into your panel and download the latest version of the InstaBuilder 2.0 plugin.

Figure 1. Download the latest version of the InstaBuilder plugin
Since the plugin is a little big, you need to upload it through FTP or file manager, NOT through your WordPress Dashboard.

Figure 2. Upload InstaBuilder through FTP
Next, you need to activate it. Get your license from your InstaBuilder Dashboard -> License and paste it into the corresponding field in Instabuilder settings from the WP Admin.

Figure 3. Activate your InstaBuilder license
Page Mockup
Before creating our first page in InstaBuilder, we need to create a sketch or mockup about it. Write it on a piece of paper your idea and you will be ready to work with InstaBuilder.
Also, you can use ready PSD file if you have, as a reference for designing your page.
Here’s our mockup. Next, we will show you how to design it in InstaBuilder.

Figure 3. Drawing a mockup of our landing page
Creating New Page In InstaBuilder
Once you’ve activated the plugin and you have your sketch/mockup ready, now you can finally start designing your landing page. Click on New Page.
The beauty of InstaBuilder is that you are designing your page independently from your theme. Meaning, you need manually to put the logo, navigation, body of the page and the footer.
If you want many similar pages (with the same header and footer for example) you can just duplicate the first page and make the further changes.

Figure 5. InstaBuilder Dashboard – Creating a new page
Now you need to choose one of the predefined templates (or create a new page from scratch). The fastest way is to select one of the templates and make changes on it.
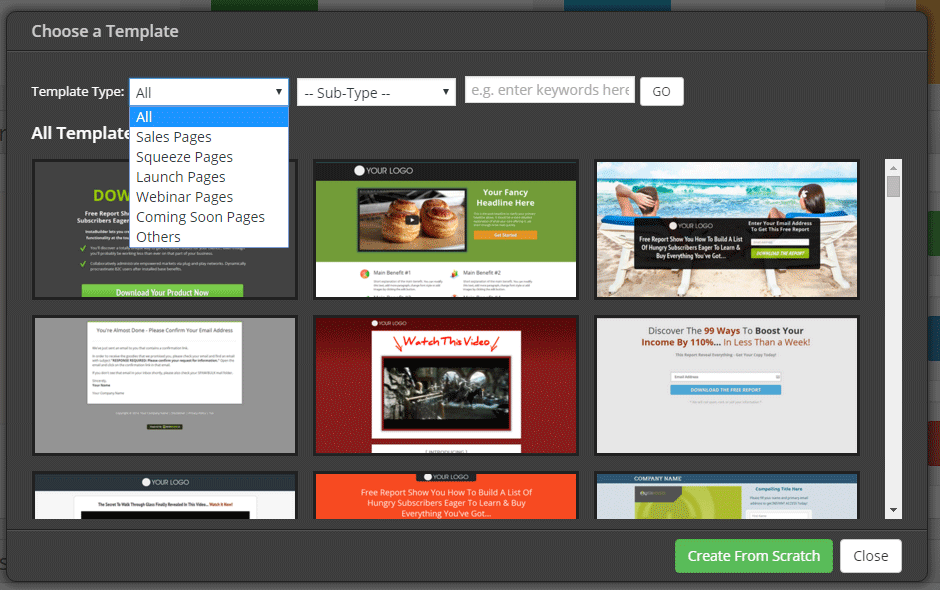
Figure 6. Choose one of the InstaBuilder templates
Once you’ve chosen your preferred design, on the left you can see all the elements that you can use with drag and drop. The elements include:
- Section

- Wide Section
- Wide Background Box
- Title Element
- Text Element
- Image Element
- Video Element
- Box Element
- Line/Divider
- Countdown
- Button Element
- Opt-In Form
- 3-Steps Opt-In
- Comment
- Social Share
- Columns
- Tabbed content
- Navigation
- Today’s Date
- Questions
- HTML/CSS/JavaScript
- Slides/Carousel

- Spaces
- Shortcode Placeholder
- Combo Elements
- Text + Image #1
- Text + Image #2
- Box + Video
- Product Box #1
- Product Box #2
- Order Scarcity #1
- Order Scarcity #2
- Fancy Opt-In #1
- Fancy Opt-In #2
- Page Settings
- Insert Graphics
InstaBuilder Section #1
Let’s say you want to design everything from scratch. Here’s how:
- Drag a new Wide Section and put it at the top of your page. You can style it by pressing on the gear button (Edit configuration) and from the right panel you can put some background for example.
- Drag the Column element and put it inside the Wide Section. By pressing the + button on the bottom right of the Column element, you can increase the number of columns if you want. If you are using some background for the Wide Section, make sure the background of the Column element is transparent.
- In the left column put the Image element for the logo. Align it to the left and press on the gear button (Edit configuration). On the right panel that will appear, choose Action -> Upload Image. Upload your logo. From this panel, you can make many configurations for the image such as image style, target link, margins, display animation and caption.
- Now in the right column, drag the Navigation element. Press on the gear button (Edit Configurations) and from the right panel choose Menu setup and select your menu.
What we’ve designed so far:
Figure 7. Inserting the logo and navigation in InstaBuilder
InstaBuilder Section #2
- Put a new Wide Section. Click on Edit Configuration -> Background Color and add your preferred color.
- Put the Column element inside the Wide Section. Click on Edit Configuration -> Background Color -> Transparent Background Color. In the Margin & Padding tab add some top and some bottom padding (maybe 30px).
- In the left column, drag the Title element, and edit it with the standard editor.
- Below the title, drag the Text Element. Put your intro text here.
- Now it’s time to drag the Button Element Click on its gear button (Edit Configurations) and customize your button. Add the button text, add an icon if you want, etc.
- Now let’s move to the right column. We need to add our video, but we will use from Combo Elements -> Box + Video for more elegant design for our video. Now click on Edit Configurations. Choose the Video Type, put the link and decide if you want your video to have autoplay and controls.
Let’s see our outcome so far:

Figure 8. Designing the second Wide Section
InstaBuilder Section #3
Now we will create our row divider.
- Add new Wide Section
- Put a Title Element inside it. You can use H2 heading here.
- Now click on Edit Configurations on the Wide Section.
- Choose Borders -> Setup Border Individually -> Top Border -> Color: #ccc; Style: Solid; Thickness: 10px
- Hide panel
And here’s our outcome:

Figure 9. Creating our fancy divider
InstaBuilder Section #4
In our next section, we will put some intro text and our main features with icon images.
- Add new Wide Section
- Put a Column Element inside it. Split it into three columns (by clicking on the + button)
- Drag the Image Element, three times inside the three columns
- Go on edit configurations on each image and upload your icon images (Action -> Upload Image). Alternatively, you can use one of the predefined images in the Graphics
- Put a Title Element below each icon image (you can use H3 heading here)
- Below each heading, drag the Text Element.
What we have so far:

Figure 10. Designing the 4th section with our main features
InstaBuilder Section #5
Now we will create another divider. Follow the procedure from InstaBuilder Section #3.

Figure 11. Designing another divider in InstaBuilder
InstaBuilder Section #6
Now we will use the zig-zag technique where we will put the elements in a zig-zag manner:
- Image on the left then text on the right
- Text on the left then image on the right etc.
Here’s how that can be done:
- Drag one Wide Section
- Put the Columns Element inside it.
- Drag the Image Element (or video) in the left column and the Text Element in the right column.
- Put another Columns Element.
- Drag the Text Element in the left column, and Image Element (or video) in the right column.
- Continue until you put all your features.
And here’s the result:

Figure 12. Designing our zig-zag technique in InstaBuilder
InstaBuilder Section #7
Now we will design our footer.
- Put a Wide Section. Click on Edit Configurations and add some color to it.
- Add the Columns Element. Split it into three columns (or maximum 4).
- Drag the text element in the first column and put some info about your company
- Drag the Opt-In Form Open the Opt-In Form HTML Code and put the code here from your autoresponder and click Process (Note: Put here only the code in <form></form> tag). If you want to use some plugin like Optin Forms, just drag the Shortcode Placeholder and put the shortcode generated from the plugin, inside this field.
- Drag some social sharing if you want into the third column.

Figure 13. Designing the footer in InstaBuilder
Congratulations! You’ve successfully designed it your first landing page in InstaBuilder. The elements described above were just the simple ones, but you can combine many other elements to create even a complex landing page. Just use your imagination and creativity, because by using InstaBuilder there are almost no limitations.
WARNING!
If you are making duplicates of the same landing page, the titles will be a mess.

Figure 14. Duplicated landing pages in InstaBuilder
However, NEVER EVER change the title of your page in the standard WP editor (From Pages -> All Pages). If you make that change, the whole landing page will go blank, and your work will be completely erased. It happened to us one time, but we’ve learned our lesson. Here’s how to put excellent titles:
- Click on the first button for edit in the Action column.
- When your landing page opens, click the gear button and choose Page Settings -> Page Info & SEO.
- Add an excellent title, meta description and meta keywords here.
InstaBuilder For Advanced Users
Sometimes, some element won’t be in the right place, and you need to put a custom CSS for advanced customization. However, InstaBuilder doesn’t have the option for that. That’s why we will be using a little common sense.
Figure 15. Discover how to add a custom CSS to an element
- First, you need to install a plugin for adding CSS per single post/page. We are using: CSS ME.

Figure 16. CSS ME – Plugin for adding custom CSS code to single post/page
- Next, open the front end of your page, and on the element that you want to be modified press right-click -> Inspect Element and precisely locate that element.
- When you’ve located your element below in the code, press right click -> copy -> copy selector.

Figure 17. Locating the code of the element
- Edit the page from the Admin Bar at the top (click on Edit Page)
- In the Add Custom CSS area, paste the selector and add your CSS code. Update the page.

Figure 18. Paste the custom CSS code
- And here’s what we’ve achieved on the frontend

Figure 19. Fixed element with the custom CSS
Note: If you can’t see any changes to your element, select another selector from the above of the element. Write your inline CSS directly in the Inspect Editor to see the changes.
Why We Like InstaBuilder
EASY TO USE
One of the dynamic characteristics of this plugin is the ease of use. You can easily use this powerful plugin without having to seek for guidance. Even a newbie can easily use this plugin because it comes with a user interface that is easy to use with simple drop down menu that has predefined styles, highlighter and much more. Some people don’t like dealing with codes, and this plugin is a perfect fit for you if you don’t like editing code because you won’t need to edit any single code line with Instabulider.
HIGHLY PROFESSIONAL
Every internet marketer has a dream to create a sales page that is highly professional and reflects a positive nature about his or her product. Instabulider can’t be far from this because it is designed with HTML5 and this makes it very responsive and, of course, professional. It might be of interest for you to know that every element of Instabulider is optimized automatically to be highly responsive both on mobile and PC. Another sweet thing about Instabulider is that it works independently, regardless of the theme you use. The pages created by this fantastic plugin are highly professional, responsive, charming and loveable.
HIGH CONVERSION RATE
No matter what you have been reading since the beginning of this article, if Instabulider lacks the ability to convert well, that is to drive massive sales of your product, then honestly it isn’t worth it. However, this excellent plugin has a very high conversion rate. You will be surprised that your conversion rate will become more than 320% if you use Instabulider to create squeeze pages. You don’t want to miss this out.
SUMMARY
Awesome! You have just finished designing your first landing page with this powerful WordPress plugin, and from everything you have seen so far, we will just summarize that InstaBulider is an excellent plugin that will help you make lots of cash in a short period with your stunning landing pages! We know that you want to make a lot of sales with perfect landing pages, so don’t waste more time, order the InstaBulider plugin today! If you stuck somewhere along the way, we are always ready to give you the needed assistance.