Introduction
Creating backup of your WordPress site is the best solution you can implement to ensure a quick recovery in case of website hack or when something wrong happens to your site. When creating a backup is important to make sure that backup is complete so that you can recover everything without any loss. And, this can be made possible only when you use a good backup plugin like BackupBuddy.
Today, we are going to take you through the BackupBuddy lesson so that you can understand and decide if this plugin is a good solution for your WordPress website or maybe not.
Quick Overview
BackupBuddy is a premium plugin for creating a backup of your WordPress website and restoring the backup in a time of need. This plugin is available for purchase in different plans. The cheapest plan will cost you $80 while the most expensive plan will cost you $297. Other plans will cost $100 and $150 respectively. With every plan, you get 1GB of free storage space on iThemes servers for successfully backing up your WordPress website.
| Gold | Developer | Freelancer | Blogger |
| $297/lifetime | $150/ per year | $100/ per year | $80/ per year |
| Backup unlimited sites | Backup unlimited sites | Backup 10 sites | Backup 2 sites |
| Lifetime plugin updates | 1 year of plugin updates | 1 year of plugin updates | 1 year of plugin updates |
| 1 year of ticketed support | 1 year of ticketed support | 1 year of ticketed support | 1 year of ticketed support |
| 1GB of BackupBuddy Stash storage space | 1GB of BackupBuddy Stash storage space | 1GB of BackupBuddy Stash storage space | 1GB of BackupBuddy Stash storage space |
| 10 iThemes Sync sites | 10 iThemes Sync sites | 10 iThemes Sync sites | 10 iThemes Sync sites |
BackUpBuddy is positioning as one of the best backup plugins available in the WordPress plugin market. But what makes it so special?
We will cover in depth the features of BackUpBuddy starting from its installation all the way to successfully making a backup, restoration or migration.
How To Install And Activate BackupBuddy?
The process of installing and activating the BackupBuddy plugin is similar to the process of installing any other third party plugin. The only difference is, once it is activated, you need to enter the license key to start this plugin and to take backup.
Go to your iThemes Dashboard and download the latest version of the plugin.
Next, go to your WordPress Dashboard, Plugins -> Add new -> Upload Plugin

Figure 1. Installing the BackupBuddy plugin
When you first activate BackUpBuddy, it will appear a window where you need to enter some essential information to connect it successfully with iThemes servers.
- The first step is for entering your primary email for getting backup and error notifications.
- The second step is for entering a password that will be required when restoring or migrating your backups.

Figure 2. Quick wizard in BackupBuddy
- The third step is reserved for choosing where you want to send your backups (both manual or automatic). The great advantage of BackUpBuddy is that it provides many storage locations including:
- Local only (no remote destination)
- BackupBuddy Stash (v2) (best; new) – You need to put your iThemes username and password for using their 1GB of free storage that you will get after purchasing the plugin.
- BackupBuddy Stash (v1) (will be depreciated soon)
- Amazon S3 (v1) – By selecting the Amazon S3 cloud for your backup storage, there will appear a new pop-up window where you will need to fulfill some basic fields like your AWS access/secret key and some advanced fields like bucket region, storage class, chunk size, etc.
- Dropbox v1 (legacy) – 1-click Dropbox authorization
- Dropbox v2 (new) – Have better implementation than the v1. If you decide on using Dropbox as your backup store, then we recommend choosing this option.
- Email – You can use this option to send the backups directly to your mail. Although we DON’T recommend using it, because emails allow files with only 20-30 MB and the backup of your site may be a lot more. This option may be good in case if you want only to send backups of your database only.
- FTP – This option is only good if you have some stable FTP storage.
- Google Drive – Sending backups to the Google Cloud.
- Local Directory – Your backups will go to your server stored on the default local file path – NOT RECOMMENDED!
- Rackspace Cloud Files – Rackspace is another cloud where you can schedule your backups, but we don’t recommend it.
- sFTP – Similar like the FTP only more secure.
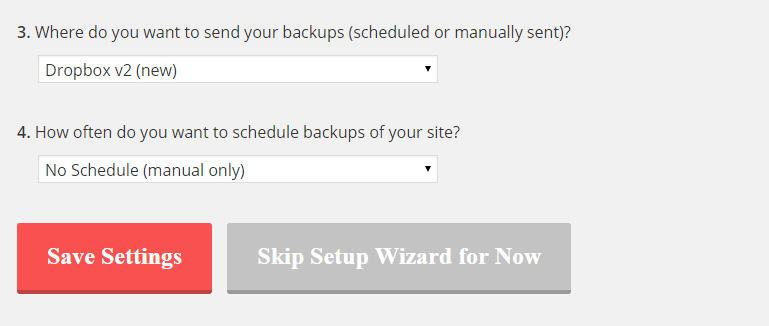
Figure 3. The second part of wizard in BackupBuddy
- The fourth and the last step of the BackupBuddy Wizard is about the backup scheduling. There are three options:
- No schedule (manual only)
- Starter [Recommended] (Monthly complete backup + weekly database backup)
- Active Blogger (Weekly complete backup + daily database backup)
Choose what most suits you. If you don’t update your website so often – choose the Starter option. If you are publishing posts constantly and making more changes, it’s a good idea to choose the Active Blogger option.
Backup
When you enter the Backup section from BackupBuddy after you’ve configured the initial wizard, you will see a screen that is asking you to create a backup of your database or to make a complete backup. Also, you will see all your recent backups that can be downloaded, restored, send to another location and some other options.

Figure 4. Creating a backup profile in BackupBuddy
Depending upon your requirements, you can either backup everything available in your WordPress directory and database or can backup only the database. In addition to this, you get the flexibility to select the files or database tables that you do not want in the backup. These can be the files that have videos, images, pdfs, etc.
When considering to backup only your database, you can choose even what to back-up from the database. By pressing on the gear symbol next to Database Only, there will appear a pop-up window for some advanced options like what database tables to back-up, database dump, integrity check, etc. We DON’T recommend messing with these options only if you must do.
Just click on the Database Only button, and wait for 1 minute. The BackupBuddy will create a zip file of your database which you can download it immediately or send it to an offsite destination.
When you want to make Complete Backup, you can also choose what directories to back-up and what directories to exclude from the backup. This is useful when you have some large Figure 4. static files that you’ve already had a copy of them. You can find this option when you click on the gear symbol next to the Complete Backup under Files & Directories.
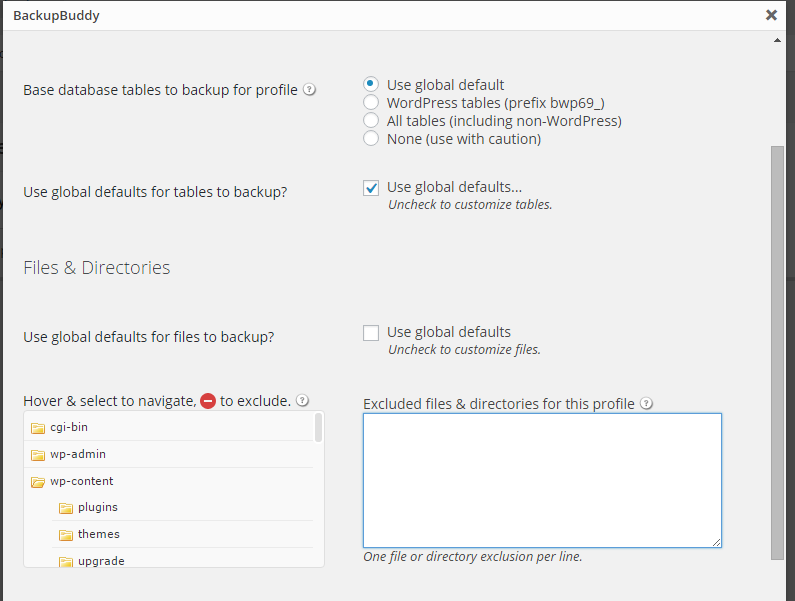
Figure 5. Deciding which directories to backup when making a full backup
Otherwise, just click on the Complete Backup and the full backup of your site will be created. After 2-3 minutes (depending on your website size) you will be able to download the backup or to send it to an offsite destination.
Restore/Migrate
In case anything wrong has happened, you can quickly restore everything from the BackupBuddy backup file. It provides you with RestoreBuddy.php file that helps you to restore the backup file quickly. You just need to upload this PHP file and the backup file (.zip file) by FTP or by File Manager from your cPanel. Remember: They MUST be in the same location.
You have the complete step-by-step documentation for migrating your site when you first enter the Restore/Migrate section.

Figure 6. Restoring and migrating your website
One of the best features of BackupBuddy is that besides for backup purposes, it is also used to migrate your site from one server to another. Moreover, this plugin automatically is replacing the old URLs with new URLs. That save your time in a great measure and keep everything in sync with the new domain and server.
So, for the Restoring and migrating part, there’s the backup below the documentation from where you can restore your full website from the backup you’ve created previously or just to restore some specific file/folder (Browse & Restore Files). Also next to it is the option Migrate which allows you to migrate your site effortlessly.
Remote Destinations
Experts always suggest that backup should not be created on the same server from where your WordPress website is being operated. Considering this fact, BackupBuddy provides you many locations to store the backup files including the same server. We’ve already covered all these options from the BackupBuddy Wizard but once again, locations you can select are: the same server, BackupBuddy Stash, Dropbox, Amazon S3, FTP, Email, or RackSpace Cloud.
As you already are familiar with BackupBuddy Stash, it is built by BackupBuddy team to let its users easily backup their WordPress websites to iThemes servers.

Figure 7. Remote destinations for storing your backups
Server Tools
You will find all kinds of information about your server in Server Tools. Starting from your server configuration, your database, directories and scheduled tasks (WordPress Cron); you will have full control of the configurations, what are the suggestions and the status.
Concerning your database, from here (Database tab) you can check some specific table inside the database and repair it if something is corrupted.

Figure 8. Server tools in BackuBuddy
Malware Scan
For accessing the BackupBuddy’s malware scan feature, you need to navigate BackupBuddy -> Malware Scan. By clicking on the button Perform New Scan Now that is located at the bottom of the page, you will perform a deep malware scan of your website. After the scanning, there will be generated a report with many details such as:
- Malware detection where you will find your malware infection status at the moment
- Web server details such as site, hostname, IP address and system details
- Web application, showing versions, notices, errors, and warnings.
- Links
- Local javascript
- External javascript
- Iframes included
- Blacklisting status

Figure 9. BackupBuddy scanner for malware
Note: Malware scan results are stored in the cache for 1 hour.
Schedules
With this plugin, you can either take backup manually or schedule it. When you first install and activate this plugin, taking an instant manual backup is recommended. But later, you should schedule it to ensure a regular backup is being maintained. When you schedule the backup, you can select the files you want to backup, backup period and the location where you want the backup.
We will make two schedules:
- The first schedule will be daily database backup
- The second schedule will be a weekly full backup.
Start by writing the name of your schedule such as Backup DB
Choose Backup profile: Database Only
Select Backup interval: Daily
Add the remote destination such as Dropbox for storing the daily database backups.
Click Add New Schedule.

Figure 10. Creating schedules for your backups
Do the same for Backup profile: Complete Full Backup and choose Backup interval: Weekly. Those are our recommended settings that we use, but you can set them how is best suited for your needs.
Settings
The Settings dashboard can be somewhat complicated if you are a beginner with this kind of technicalities.
From the General Settings tab, you may only be needed to change how many days you want to keep your backups in Local Archive Storage (in case you choose to store your backups on your server).
From the Advanced Settings/Troubleshooting tab, you may need to choose Maximum local storage usage to be limited for example 300 MB. For the other settings we’ve already configured them for you and we are providing the settings file of BackupBuddy, ready to import it to your site and start functioning perfectly.

Figure 11. General settings where you need to enter your BackupBuddy credentials
Those were the top features of BackupBuddy. We’ve covered in details and as you see all features look good enough to let everyone invest in this plugin. Moreover, the speed of creating a backup is excellent.
Pros And Cons
| Pros | Cons |
|
|
Conclusion
Almost everything in this plugin is good; however, some people may feel that it is costly. According to us, the cost is nothing much compared to the time and money you had invested in building up your website or blog. Suppose, after two years of your investments, one day your website is hacked, and you have no backup then what will you do. Hard work of 2 years is gone just like that, and that’s why it is better to make a little investment than being empty handed.