When examining the top membership plugins for 2016, we stumbled upon the MemberPress plugin. MemberPress is a premium WordPress plugin for constructing a powerful membership site with a lot of advanced features. The plugin provides a wide variety of features from restricting access to the entire site, restricting only certain parts of the content, and what we personally most like about this plugin: restricting file downloads such as eBooks, mp3, reports, etc. The plugin has very neat interface build on native WordPress UI and it very easy to configure it. Also, MemberPress can be configured with any WordPress theme and can be integrated with a bunch of payment gateways.
With MemberPress, you will be able to create unlimited membership levels or multiple subscriptions plans and easily manage and track all of them. In this MemberPress lesson, we will give our best to provide a full overview of the capabilities of this plugin, helping you to decide if it’s a right choice for your membership website.
MemberPress Installation
When you first buy this plugin, what you need to do is to LOG IN to your MemberPress account and download the latest STABLE edition. Also, copy your license key and keep it safe. You will need later for activating the plugin and the add-ons. Next, you need to install the plugin by uploading it just like any other regular 3rd party plugin.

Figure 1. MemberPress installation
After the upload, there will appear notifications for activating the plugin and for configuring. Just use the MemberPress license key that you’ve copied before and you are ready to begin configuring your new membership plugin.

Figure 2. First notification after MemberPress installation
Easily Configure MemberPress
We will start with the Options panel as the notification suggests. Firstly you’ll need to configure the plugin and then start adding subscription levels, restrictions and creating your overall membership site.
Pages
We truly like automated tasks, so we were very pleased when saw here that this plugin has automatic creation of the basic core pages required for your membership site:
- MemberPress Thank You Page
- MemberPress Account Page
- MemberPress Login Page
Moving further, below you can configure the URL friendly name (slug) of group pages and membership pages. The default values provided in these fields are good enough for us.
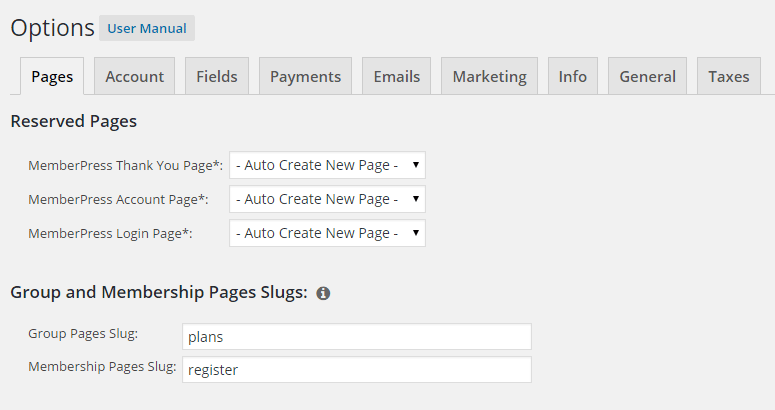
Figure 3. Auto creation of the necessary pages in MemberPress
In the Unauthorized Access area at the end of the Pages tab, you have 3 options. Depending on how you want to inform your audience of non-subscribed users for the unauthorized access to your pages/posts, here you have 3 options:
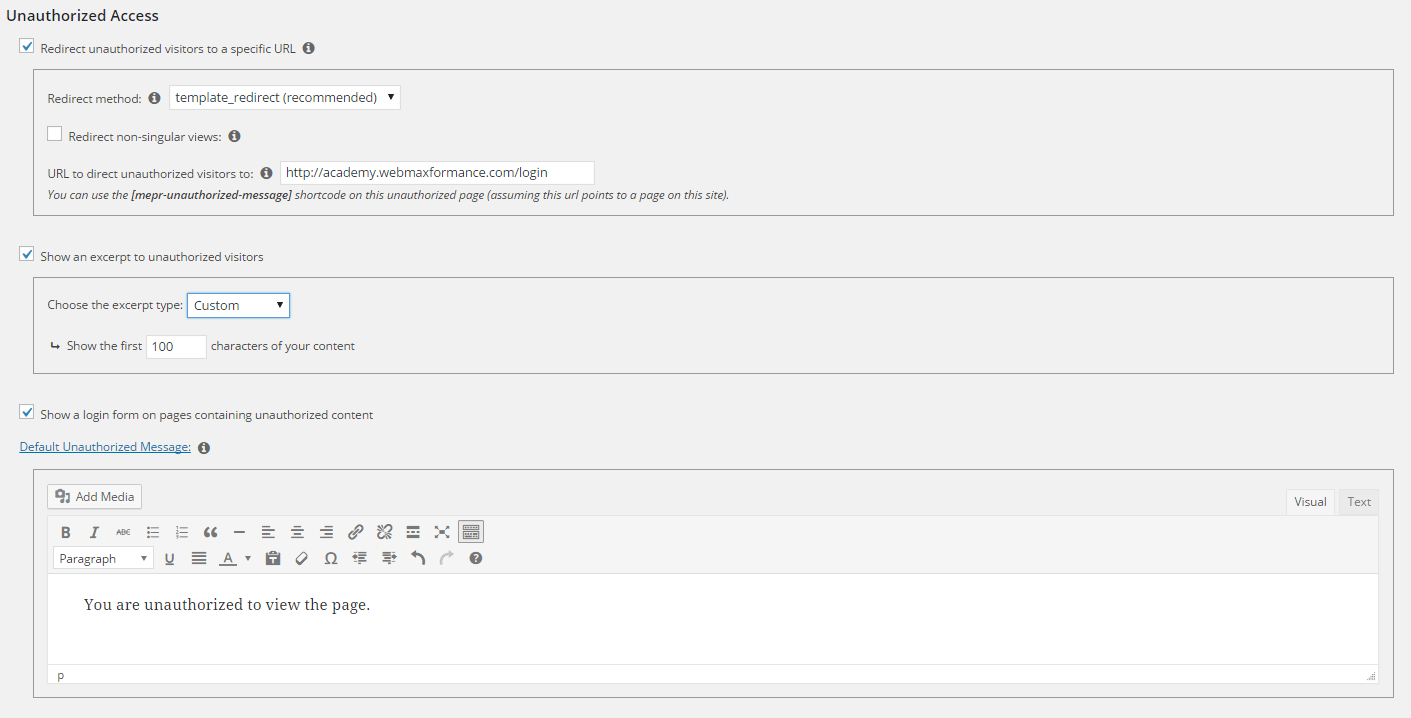
Figure 4. Options for informing the non-subscribed users for the unauthorized access
- Redirect unauthorized visitors to a specific URL
This option is self-explanatory, and when checked, the unauthorized people on your site will be automatically redirected to the URL that you will specify here. Otherwise, the Default Unauthorized Message will be shown. Our recommendation at this point is to leave this option unchecked □
- Show an excerpt to unauthorized visitors ☑
This option allows your users to get a sneak-peak (teaser content) of your protected page. In this option you can choose your preferred excerpt type:
- More Tag (Where will be shown only the content before usage of more tag in your posts/pages)
- Post Excerpt (Will be shown everything that you will write in the excerpt field below your post/page)
- Custom (Enter the number of the first characters that you will want to use as a teaser content)
Note: These options are used globally as defaults on all of your posts/pages where you want to have teaser content. If you want to use some different settings to a particular post/page, you will find the same options bellow your post/page that will apply only to that post/page.

Figure 5. Using the teaser (excerpt) content
- Show a login form on pages containing unauthorized content ☑
In the end, you need to configure your Default Unauthorized Message that will show up whenever the user is trying to see protected content. Now you are ready to move to the next tab.
Account
The Account tab is really about the accounts of your users and their preferences. At this step you can set:
- Permissions for your users
- Registration-related preferences
- Login and logout redirect pages
- Account page welcome message
Concerning Permission area you have some cool options that you can check. All the options here are also self-explanatory. The first option “Disable the WordPress admin bar for members” allows you to hide the standard WP admin bar for your members. If you want your users NOT to know that you are using WordPress than check this option as well as the option next to it: “Keep members out of the WordPress Dashboard.” Next option “Allow Members to Cancel their own subscriptions” is found only in a few WordPress membership plugins and by checking it, you can allow your users to cancel their subscription at any time. In the end, there is an option “Allow Members to Pause & Resume their own subscriptions” and if your users are paying with PayPal or Stripe, you can allow to them this option.

Figure 6. Decide what permissions you will allow to your subscribers
In the Registrations area first you can set the Password Strength Meter, and you have 5 options here, but we (and the MemberPress team) recommend choosing Show & Require Medium Password or Stronger (Recommended). This option allows an indicator of password strength to be shown when entering the password on the registration form. The next options that we recommend to be chosen here are:
- Disable the standard WordPress registration form ✓
- Enable Coupon Field on membership registration forms (if you are using coupons) ✓
- Pro-rate subscription prices when a member upgrades ✓
- Require Terms of Service on membership registration forms (optional)

Figure 7. Registration options for your users
In the Login and Logout section, you need to enter the required URLS for directing member after login and after logout. Follow our example:

Figure 8. Entering the required URLS for directing member after login and after logout
The last area is for your Account Page Welcome Message. Write here how you want to welcome your users.
Fields
The Fields tab is reserved for customizing the fields that will be shown on the registration form. You can choose what fields will need to be just shown or required. Also, you can add new custom fields including all types (text field, email field, text area, dropdown, etc.)

Figure 9. Customizing the fields that will be shown on the registration form
Payments
Now we will configure our payment method. We will show you how can you easily set up “PayPal Express Checkout”. Note: This option is available for anyone who has PayPal account before 2009 and has enabled Digital Goods on their PayPal account. Skip to the next part if Digital Goods is not available in your country or your PayPal account is newer than 2009.
- Click on the + button to add new payment method
- Enter the name that will be shown on the registration page such as “PayPal Secure ”
- Choose Gateway: PayPal Express Checkout
- For the API username, API password and signature you need to sign to your PayPal account. Go to Profile -> My Selling Tools. Under API Access click Choose the second option on the right: View API Signature. Copy those credentials from over there and put it in the corresponding fields in MemberPress Payment tab. Leave “Use PayPal Sandbox” unchecked because that’s for testing purposes.
- PayPal IPN URL for express checkout need to be copied by clicking on the copy button on the right. Now go to your PayPal profile again. Navigate to Profile -> Selling Tools. Scroll to Instant Payment Notifications and click Now click on Choose IPN Settings and paste the copied link in the field provided here. Check Receive IPN messages (Enabled). Click Save and you are good to go.

Figure 10. Configuring the PayPal payment info
Now, this is the part where we explain how to configure PayPal Standard integration if your PayPal account is newer than 2009.
- We are in the Options panel in MemberPress on the Payments Click on the + button to add a new payment method.
- Enter the name that will be shown on the registration page such as “Paypal Secure ”
- Choose Gateway: PayPal Standard
- Enter your Primary PayPal Email
- The Advanced Mode only works for PayPal accounts created after 2009, and it provides you with the options to control canceling, pausing/resuming and refunding subscriptions. For using this option you need to obtain your API username, API password and signature from your PayPal account as we did previously for PayPal Express Checkout (step 4)
- PayPal IPN URL need to be copied and put in your PayPal profile as we did previously in step 5. Navigate to Profile -> Selling Tools. Scroll to Instant Payment Notifications and click Now click on Choose IPN Settings and paste the copied link in the field provided here. Check Receive IPN messages (Enabled). Click Save.
- Return URL need to be copied as well and put in your PayPal profile. Navigate to Profile -> Selling Tools. Go to Website Preferences and click Update. Choose Auto Return: ON. Paste the Return URL in the corresponding field below. Set Payment Data Transfer: ON. Block Non-Encrypted Website Payments: OFF. PayPal account option: ON. Leave everything else as it is. Contact telephone: OFF. Support giropay and bank transfer payments: NO.
- Click Save and wait for a little.
- Now go to MemberPress where we left and click Update Options.
- You are done!

Figure 11. Configuring The PayPal Standard system
Note: MemberPress also supports Stripe and Authorize.net (Authorize.net – In the Developer Edition license only) as payment methods, but we won’t focus on those methods at this point, you can check their official documentation if you want to set them up.
Emails
We also won’t waste too much time on this tab because the options for the emails are self-explanatory. In addition, next to every mail option you have an icon which when hovered, it tells you more about the particular email option. You have emails for nearly everything. They are easily customizable using some of your HTML graphics and standard MemberPress email shortcodes. Spend some time here if you want to incorporate your graphics in the emails and further stylize the default emails.

Figure 12. Easily customizable emails in MemberPress
Marketing
MemberPress very easily integrate with autoresponders. For MailChimp, for example, you just need to put your MailChimp API key, and the MailChimp list will be automatically populated. You also have options for enabling double opt-in and opt-in checkbox.

Figure 13. Connecting MailChimp settings with MemberPress
For Aweber, the procedure for integrating is even further automated. You just need to click on the button that says “Connect to AWeber’s API” and the OAuth mechanism will take care of the rest.

Figure 14. Configuring Aweber with MemberPress
MemberPress have many integrations with different autoresponders. The beauty is that it is very easy to connect your favorite autoresponder with MemberPress in a matter of seconds with few clicks. But first you need to go to MemberPress panel -> Activate -> Add-ons and install the autoresponder integration plugin from here first. After successful installation, the add-on(s) will appear on the Marketing tab.

Figure 15. All autoresponder integrations in MemberPress
Info
We came to the Info tab where we need to enter our Business Address information. This is being used for including the info in email receipts, for tax handling, etc. We highly recommended you to put your real Business information here to appear as a genuine and serious business.

Figure 16. Put your real business info
General
In the General tab, first, you need to configure the basic currency that your customers will be using for paying. The default options are good enough for us. We recommend not to touch the other options unless you have some issues like theme compatibility, rewrite rules issues, sending emails, etc. Take a look at the SEO & PayWall area only if you want to:
- Authorize search engines to index your protected content
- Block search engines from indexing your protected content
- Enable PayWall which means allowing free page views for guests (not recommended)
Taxes
You can decide to enable tax calculations on transactions on all memberships other than those where tax calculations have been specifically disabled. The options for configuring the taxes are self-explanatory so you won’t have any problems configuring the taxes.

Figure 17. Enabling tax calculations
We finally come to the end of MemberPress configuration. We covered in depth all the options that need to be considered when you firstly install the plugin. Let’s move on to the creating membership levels, product options, access rules, coupons and everything else necessary for building an advanced membership site with MemberPress.
Creating Your First Membership Level With MemberPress
In this part, it all starts with product creation i.e. the membership level. Go to MemberPress -> Membership -> Add New. Now enter the title of your membership level and move to the setting up the price on the right.
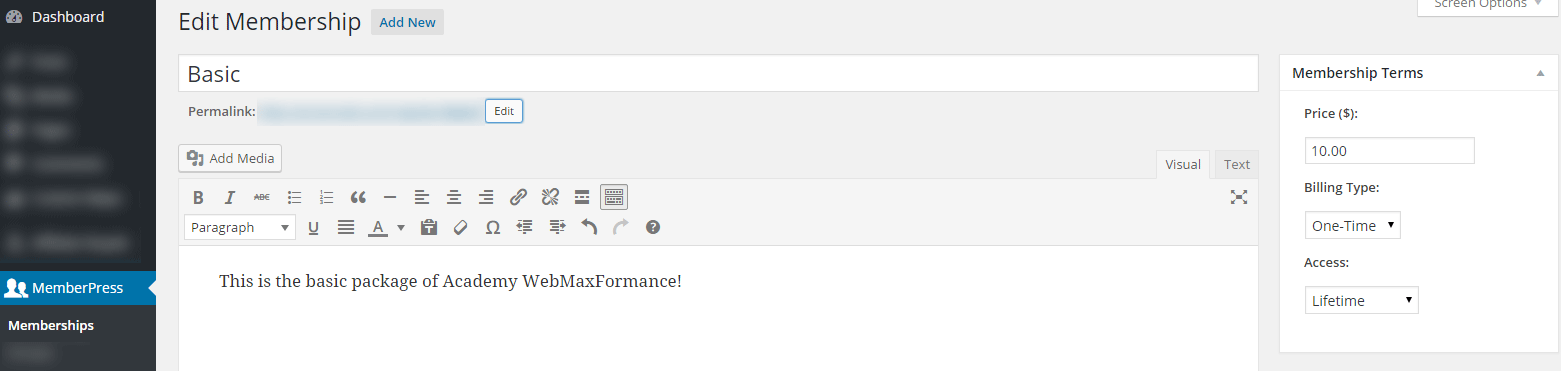
Figure 18. Creating new membership level in MemberPress
As you can see on the right for the price you have three fields for setting up:
- Price – Enter the sum here of how much you want your membership level to cost.
- Billing type – You can choose here whether it will be recurring or one-time payment. If you select one-time payment, you can choose in addition whether it will be a lifetime subscription or it will expire at some point. The chances are since you are building membership site you want this option to be recurring. When you select Recurring, you will need to choose your recurring interval.

Figure 19. Configuring the recurring payments in MemberPress
- Access – If you previously select the recurring type now you can set all kinds of recurring options. It includes, for example, providing a trial of 7 days for 1$ and then paying $20 monthly for ten months and after ten months lifetime access. So at this point, MemberPress is allowing you to create the most suitable paying option that works exactly as you want to.

Figure 20. Configuring the recurring trial
Below, you will see the product options. The guys from MemberPress truly put an effort in this part providing you many custom options for your membership level.
- As you can see from the image below, the first tab in the Membership Options is Registration where you can set:
- Registration Button Text
- Custom Thank You Message (that will appear when someone buys this particular membership level)
- Send Membership-Specific Welcome Email to User (where you can set up the custom welcome mail for anyone who buys this membership level)
- You can Customize Payment Methods (where you can choose which payment methods you want to be available for this level)
- You can Customize User Information Fields (the one that you’ve previously created in Options -> Fields … if any)
- And you can use the Membership Shortcodes (if you want to include somewhere else the registration form of this level)

Figure 21. Options for registrations
- This tab is reserved to give specific restrictions for your membership levels. So first you can set you whether you want to allow users to create multiple, active subscriptions to this membership. By choosing this option, you are allowing your users to buy this membership level multiple times ( an option that is rare among the membership plugins). Next, you can set up who can buy this level. As you can see from the picture below you can choose how many different permissions you want:
- The membership level to be accessible to everyone (including guests and members)
- The membership level to be accessible to guests only
- The membership level to be accessible to members who have purchased anything or nothing.

Figure 22. Configuring the permissions for your users
- For the Price Box, you can set up how to want the price area to look like and what benefits to include. This is useful when creating Price Comparison Table (or MemberPress Groups) later. Refer to the image below.

Figure 23. Configuring the price box used later for price comparison table
- The Advanced tab is reserved for some advanced options like:
- Membership Access URL. This is the URL where those who purchase this membership can get the content they now have access to.
- Membership Pricing Terms. (How you want your pricing terms to be displayed on the registration page)
- Custom Login Redirect URLs
- MailChimp list for this Membership (Setting up customers who bought this membership level to be automatically added to your autoresponder list. Make sure that you have successfully integrated your autoresponder in Options -> Marketing.)

Figure 24. Advanced membership options
Click on PUBLISH and your first Membership Level is successfully created!
MemberPress Groups – A Nice Price Comparison Table
If you are already familiar with the concept of Price Comparison Tables, then MemberPress Groups will be very easy for you to grasp. After you’ve done creating your Membership Levels navigate to MemberPress -> Groups and start creating your price comparison table.

Figure 25. Making price comparison table with MemberPress Groups
If you’ve put the benefits as we described in Price Box feature in the previous step, then here you will need just to add your membership levels and your first group or comparison table is AUTOMATICALLY done.

Figure 26. Generated price comparison table
MemberPress Rules – Custom Protect, Drip & Set Expiration
By this point, you’ve created your membership levels and your content and now you need to protect it. You can protect it by using the Rules. Navigate to MemberPress -> Rules. Select what kind of content you want to protect (single post, page, group) and below select which membership levels should have access to that content. Note: Administrators are immune to the rules, they only apply to non-administrator users.

Figure 27. Protect your content using MemberPress Access Rules
- Enable Drip. You can set a time for the Rule to drip (meaning, to become available) for example after member register, member purchase something or after fixed date. Let’s say your membership level contains 20 pages with training videos that need to become available one at a time after month passes. You can use this Drip option and manually set after how much time each page you want to be available (2nd page after 30 days of the purchasing the level, 3rd page after 60 days of the purchasing,) The downside is that you will need to create 20 different rules each for every page, but it is one-time work.
- Enable Expiration. You can set expiration time (after how much time it will become unavailable) based on any fixed amount of days, weeks, months, or years, after a trigger has been made (member register, member purchase something or after fixed date.)
Our tip of the day: Also, it is a good idea when creating accessing pages for your membership levels to use parent – child pages. Let’s say you have membership level named Basic. First, create a page named Basic. Then every page you will create for the Basic level you need to choose to be a child of the parent page Basic.

Figure 28. Using MemberPress rules effectively with parent-child technique
This is useful for faster protection of all your pages from the specific membership level when creating the rule for protection. Using this way you can protect all pages of the membership level with just single rule by choosing Child Pages Of option. See the image for reference.

Figure 29. Access rules for all child pages
And our favorite… If you want to protect custom uploaded file on your site: mp3, pdf, avi, you need to use the Custom URI option from the Rules. Before uploading your files first read their detailed documentation for advanced protecting your files.
Coupons
If you have checked “Enable Coupon Field” previously in Options -> Account, then now you have to configure your coupons. Go MemberPress -> Coupons -> Add New. The discount that your coupon will be offering can be in percentages or fixed amount. You can choose how many times an individual customer can use this coupon. You can also set the coupon expiration and to which membership users it will apply.

Figure 30. Using coupons in MemberPress
MemberPress Reminders
The Reminders in MemberPress serves you to send out automated emails to your members when some events are about to happen or already happened.

Figure 31. Remainders in MemberPress
Go to MemberPress -> Reminders -> Add New. Here you have options to set the Trigger (can be set to hours, days, weeks, months and years) for the event. Also, you can enable or disable subscription reminders for the User and Admin.

Figure 32. Remainders in MemberPress, part2
Subscriptions, Transactions & Reports
We are truly satisfied with the level of details provided in the statistics of subscriptions, transactions, and reports. MemberPress track all the payments when new or recurring payment occurs and puts them in the Transaction Dashboard. From there you can view or filter out everything you want and export the complete Transaction statistics in CSV file. A subscription is created every time a member buy a membership level with recurring billing cycle. One subscription can have multiple associated transactions. Easy to read and interactive charts are part of the MemberPress Reports Dashboard. Here you can view all of your transactions and filter them by showing yearly, monthly or by membership level.

Figure 33. Reports in MemberPress
Add-ons
MemberPress is offering a variety of add-ons that you can find in MemberPress -> Activate -> Add-ons. Here’s what you can find here:

Figure 34. All MemberPress add-ons
What was most interesting for us is that you can use the Affiliate Royale add-on with the MemberPress license key. So when you combine MemberPress with the Affiliate Royale plugin, you can skyrocket your sales by growing a team of affiliates marketing your product for you. Very nice touch!
Pricing
MemberPress is a premium WordPress plugin available in 2 pricing plans:
- Business Edition: $99 for use on one site
- Developer Edition: $199 for use on unlimited sites
Pros and cons
| Pros | Cons |
|
|
Final Words
And that’s pretty much it! We‘ve done a very detailed elaboration of this plugin so we hope you will like it. We covered everything from properly configuring the plugin to successfully creating the membership levels, comparison tables, tips for protecting your pages creating coupons and much more. The cons for using this plugin are not so bad considering everything that you are getting with MemberPress. Also, we think that the plugin is for semi-tech users.
If you are a complete beginner, you might find some options a little bit confusing. But with this guide, we think that we solve that potential problem for you. So if you are building a relatively complex membership site that needs to have some advanced features like custom restrictions or drip content, and if your budget allows it, then we highly recommend buying MemberPress plugin for your membership site. You won’t regret it.