Having a WordPress site up and running is a great goal, but how can you get there?
First, you’ll need an URL address (called a domain) that people can type into their browser to get to your website. Today, you will learn where and how to purchase your domain. A domain name is the actual URL of your website that people will type in their browser to reach the specified website (for example www.wmfacademy.com).
How To Buy A Cheap Domain
We highly recommend buying your domain SEPARATELY from your hosting. (Don’t worry. Hosting is discussed in the next lesson.) To put it another way, we recommend you buy your domain from one company and your hosting from another. This separation of the domain name and hosting services is due to some technical reasons, and it can save you a lot of troubles in the future. For now, please trust us on this!
Here, we will show you how we buy our domains (using two separate examples of domain companies). Make note that our recommendations are based on our experiences as an independent paying customer, we are not affiliated with any domain company. While we introducing domains here, let us make another recommendation: we advise that your domain name has .com extension, and it is easily memorable (you want to build a BRAND after all). The oldest Search Engine Optimization (SEO) trick in the book is to use a “.com” domain in order to rank faster on Google. However, using another extension (.net, .info, .biz) is not a big mistake, and you can use it if you want.
Buy A Cheap Domain From NameCheap (RECOMMENDED!)
Our domain company recommendation is NameCheap. In our 5+ years experience with Namecheap, they have not failed to provide excellent service along with good interface and lower long-term prices. Before buying a domain from NameCheap, you need to register an account.
- Start by clicking on the SIGN UP button at the top.

Figure 1. Sign up to NameCheap
- Next, fill in your information.

Figure 2. Register an account at NameCheap
- Now, you need to search the availability of your chosen domain name.
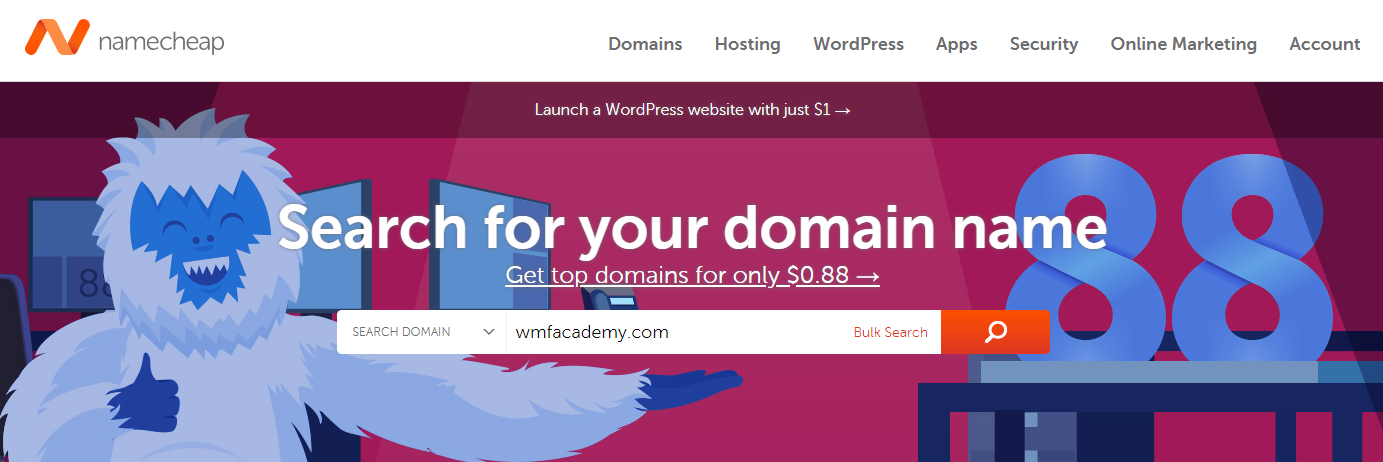
Figure 3. Search the availability of your domain name
- On the next screen, you will see whether your domain is available or not. Click on the “add to cart” button and go to View Cart.

Figure 4. Searching for available domain
Note: Get in a habit when purchasing your domain to look for a coupon code on Google. This can save a few dollars if you are on a budget.
- Get the Promo Code that is valid, and put it the corresponding field.
- Click Apply.
- Next, you need to Confirm Order. You don’t need the additional “upsells” that they provide. You will get everything else when you buy your hosting.

Figure 5. Search on Google for Promo Codes when buying new domain
When you have successfully registered (and confirmed your domain), you need to connect it with your hosting provider, but that’s a story for our next lesson.
In the Advanced WordPress training, we will see how to register a cheap domain with GoDaddy, another domain provider.
Summary
In this lesson, we have taught you how to buy and set up your domain. Also, we told you how to purchase a cheap domain and how to save a few dollars by using the promo codes that from the Namecheap.
The main takeaway from this lesson: We highly recommend buying a domain from NameCheap!
Now move to the next lesson for hosting purchasing and setting up.