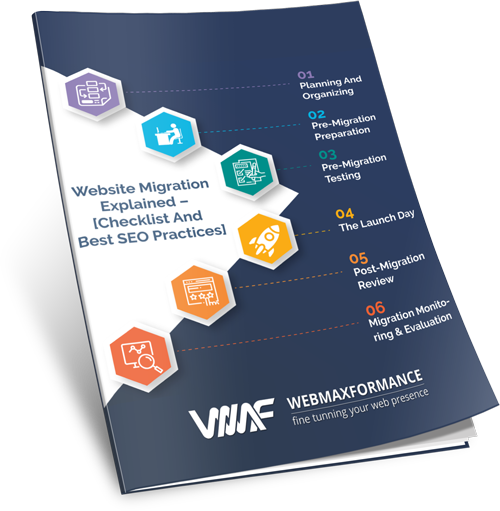
Website Migration Explained –
Checklist & Best SEO Practices [2020 Guide]
It’s a Monday morning and you are over the moon happy that you are about to migrate your 100k pages website today.
You’ve done your homework to find and hire the best SEO migration expert in the city to work his magic and press the “Migrate” button. So by the end of the day, you expect the complete website migration to turn out smooth as silk, and to end up with new freshly redesigned and revamped website that will generate x10 times more traffic and leads.
…but there is one little problem!
Most of the time (like 99% of the time) this is NOT how things work behind the scenes, regardless of how much you’ve paid the website migration guy.

[toc no_label heading_levels=”1,2,3,4″ exclude=”1 Website Migration Explained –Checklist & Best SEO Practices [2019 Guide]
Website Migrations Are Tricky And Can Lead To
SEO Disaster If Planned Poorly
![]()
There is a potential threat for any business owner who wants to migrate his website.
Among all the excitement with the new look and feel of the website, there are so many things on multiple levels that can go wrong, because this is probably the most dangerous task in the digital marketing world.
Depending on the site migration type, you need to consider moving, updating or merging:
- All content
- All website files
- CMS Technology
- Website architecture
- Website design & UX
…and everything else that you and your team members have been working on for the past few years.
If this doesn’t sound overwhelming enough for you yet, there is one last risk:
The overall website overhaul can also cause a huge slump in your organic traffic!
And that’s not what you want right now. Or ever.
According to one SearchEngineWatch study, brands often migrate to a new web design or new domain name without considering their current SEO standing, which naturally leads to poorly executed migration.
In one recent tweet, John Muller – the webmaster trends analyst at Google, refers to the website migration as a horror story that needs to be addressed diligently.

Source: https://twitter.com/JohnMu/status/988936277721534464
In order to avoid the unwanted web migration “adventure” and potential migration horror, we’ve put together a simple step-by-step website migration process consisting of 6 phases that we live by at WebMaxFormance Marketing Agency.
This website migration service is something we do on a daily basis for our clients, and because we’ve witnessed so many website migration pitfalls, our web migration experts have decided to prepare this nice little migration guide to help even non-tech people.
The good news is, at the end of this article, you will find a downloadable website migration checklist in PDF format. It will help you to plan and execute your website migration smoothly and to ensure long-term SEO success.
Enough chit-chat for now, let’s start with Website Migration Phase #1.
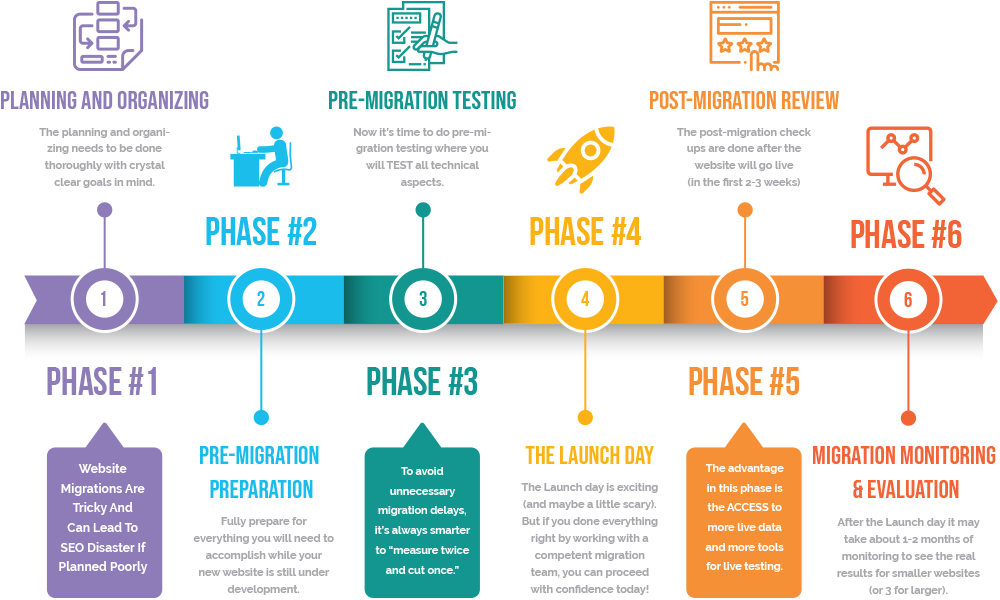
Website Migration Steps – 6 Essential Phases
![]()


Website Migration Phase #1 –
Planning And Organizing
The planning and organizing need to be done thoroughly with crystal clear goals in mind.
1. 1. Identify Your Website Migration Type And Its Associated Objective
Everything starts with a great plan.
But when it comes to website migration, the planning and organizing need to be done thoroughly with crystal clear goals in mind.
Not all website migrations are the same. There are multiple reasons and expectations behind every website migration project that need to be defined from the very beginning. From this step onward make sure to include SEO experts in the migration process.
So depending on the migration type, there will be specific migration objectives.
Before going further with the planning part, first let’s see some of the common website migration types and their associated objectives you may need to identify at this phase.
Common Website Migration Types –
What Kind Of Site Migration Do You Need

- Switching Domain Name -> Objective: Business rebranding or changing the domain from a ccTLD (country code top-level domain like co.uk) to a gTLD (generic top-level domain like .com)
- Switching from HTTP to HTTPs -> Objective: Security (serving your website over secure SSL protocol) and traffic boost. Note: This is where most website migrations fail, so be extra careful here!
- Switching to new CMS platform -> Objective: Increase functionality, remove technical limitations, improve UI & UX. Example: Joomla to WordPress website migration.
- Website content migration -> Objective: Content consolidation, rewriting and removal to address cannibalization of multiple duplicate pages about the same topic. The end goal here can be improving the site’s organic search visibility in the SERPs.
- Website redesign -> Objective: Changing the whole website look and feel by including new fresh media and optimized code for better website performance.
- Changing URL structure -> Objective: Changing website architecture by making structural changes to the taxonomy, navigation, slugs, and internal linking.
- Switching hosting provider -> Objective: Better support, server speed, and performance.
- Mixed migration (all possible combinations) -> Objective: Combination of the objectives mentioned above.
1. 2. Identify Website Migrations Risks
Since the website migration is a very delicate task, there are many risks involved in the process.
That’s why you need to make an extra effort to identify all the migration risks that may have a negative impact on the website SEO.
Our website migration experts from WebMaxFormance always make sure to prepare forecasting scenarios about all the possible expectations, risks and the necessary precautions that need to be taken beforehand.
For example, the most common expectations after the migration are:
- Ranking fluctuations (“The Google Dance”)
- Temporary traffic drop
But to make better migration risk management, you need to be AWARE of why website migrations fail…
Why Website Migrations Fail –
7 Common Site Migration Pitfalls

- Poor planning (Solution: Come up with a detailed and flexible migration project plan as early as possible. Also make sure to map out all dependencies of the people involved.)
- Poor strategy (Solution: Make realistic and measurable objectives with website growth in mind.)
- Lack of awareness of the possible migration risks (Solution: Identify what can go wrong! You can’t be really paranoid here.)
- Not having a definitive website migration checklist (Solution: Get our complete checklist at the end of this article.)
- Lack of knowledge of the SEO migration technicians (Solution: It goes without saying that the migration process needs to be carefully handled with experienced SEO migration consultants.)
- Lack of resources allocated to the website migration project plan (Solution: Estimate the time, effort and budget required to make it a successful site migration. We recommend to add an additional 20% of additional resources if (God forbid) something went wrong.)
- Lack of proper testing and bug fixing (Solution: Dedicate extra time and effort for thorough testing before launching your website. Also be prepared for a fast response to major technical obstacles and bugs.)
1. 3. Build A Competent Website Migration Team
We are really sorry to tell you that it’s not enough just to have one favorite SEO migration guy who is pressing some magical “Migrate” buttons to make a successful site migration.
The website migration is a complex process, and depending on its complexity, it usually involves multiple people:
- Designers
- Developers
- Copywriters
- SEO Experts
- Project managers
- Server administrators
Plan a kickoff meeting with everyone in the room who is impacted by the migration project plan. It’s crucial for everyone to be on the same page.
1. 4. Map Out Tasks
Once the team is gathered, create a list of tasks that need to be done during all 6 website migration phases. Next, assign all the tasks to the right people.
Every task needs to have an expected delivery date and an owner responsible for the deadline of the task.
Also, any dependencies between the people involved in this migration project should be identified here. So everyone should be aware of any migration activities that cannot be fulfilled because they are dependent on others.
Our migration checklist can help you map out all the tasks and put them in your favorite Project Management software.
Here’s what software can be used for creating, assigning and managing tasks:
- Teamwork (Recommended)
- Trello
- Google Sheets


Once this is done, it’s time to for the final planning step: Planning The Launch Date.
1. 5. Choose The Best Moment To Launch
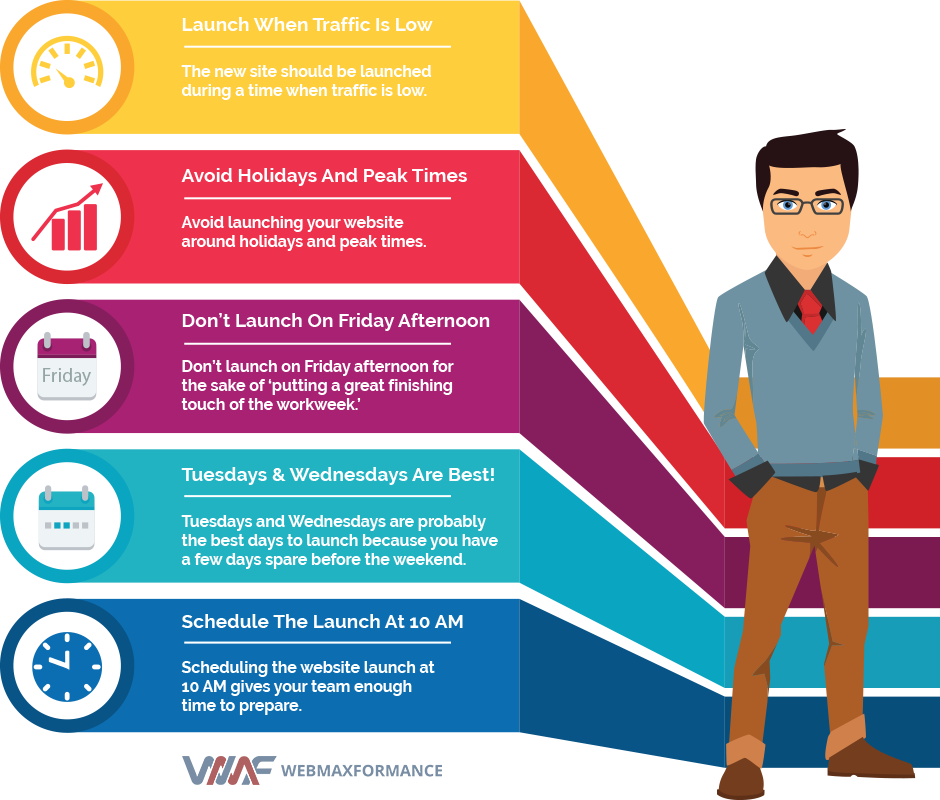
A crucial part of the website migration project plan is setting the anticipated launch date correctly.
Again, sorry to hear this, but Monday morning is not the best possible time to migrate your website.
Take a look at our TOP 5 recommendations for choosing the ideal website launch date:
- The new site should be launched during a time when traffic is low.
- Avoid launching your website around holidays and peak times.
- Don’t launch on Friday afternoon for the sake of ‘putting a great finishing touch of the workweek’ and celebrating it later at the weekend with your colleagues.
- Tuesdays and Wednesdays are probably the best days to launch because Mondays are infamous for meetings and stating how much you hate Mondays. Also, this way you will have a few days spare before the weekend to fix some possible critical issues.
- Scheduling the website launch at 10 AM gives your team enough time to get to work, drink coffee and put higher focus for the rest of the day on the site migration.
Note:
Bear in mind that often site migrations don’t go entirely to the defined project plan. That’s why we’ve mentioned that flexible migration project plan is needed if things don’t go as expected.
1. 6. Key Takeaway Of The Planning Phase
- We cannot stress enough how much this planning phase is really important!
- Always make sure to take extra time to allocate enough resources for the website migration project plan.
- Gather your team of professionals and educate them of the migration objectives and risks.
- Assigns the necessary migration tasks with deadlines and task owners.
- Compose a solid site migration checklist and move to the next phase…
Website Migration Phase #2 –
Pre-Migration Preparation
Fully prepare for everything you will need to accomplish while your new website is still under development.
The whole purpose of this migration phase is to fully prepare for everything you will need to accomplish while your new website is still under development.
This is where most experienced SEO veterans need to bring their A-game!
2.1. Define Technical SEO Requirements
Site migrations are much more than simply redirecting URLs from one domain to another.
For more complex website migrations that involve a redesign or CMS change, always make sure to clearly define the SEO requirements in a very detailed way that can be easily understood by the developers. The idea is to help them get more insight into the scope of work at hand.
Defining the technical SEO requirements in a brief and concise manner can help you define the task timeframes and plan the budget.
If you are undertaking complex migrations like full website overhaul, each of the following technical SEO requirements need to be considered and handled with extra care:
- URL structure – Put in Google Sheets or Excel all permalinks of your web pages, including protocol.
- Meta Data – Next each URL put the corresponding title and meta description.
- Structured data – Take note of any existing Open Graph markup (Schema) details around your page’s content.
- Canonical and meta robots tags – Put attention to any rel=”canonical” and rel=”noindex, nofollow” tags that need to be present on your web pages.
- Main & secondary navigation – Define which pages will go in the primary and secondary menu.
- Body copy and headings (H1 – H6) – Make sure that the order of the elements is preserved and other elements (such as title and navigation) are not affected.
- Images and other media files – Organize all images, videos, PDFs and all other file types that will go in the media library. Also, take a look at their file sizes and make sure they are optimal. Note: While you are here, it’s a good idea to write corresponding alt tags for each image.
- Backend code (CSS, JavaScript) and widgets – Identify the background codes and widgets needed for proper website functionality.
- Internal linking – Identify all internal links of your indexable web pages.
- Pagination – Identify where on your website you will require pagination (usually on Blog or Archive section).
- Custom 404 page – Plan out your custom 404 pages that will help the lost visitors.
- Robots.txt configuration – Put extra attention to the content of this file when implementing it for both staging environments and the new website launch.
- HTML and XML sitemaps – Create correct XML sitemaps that can be easily understood by the search engines and HTML sitemaps easily understood by humans.
- Hreflang attributes – If your website is international, put some attention to these attributes responsible for serving the right content to the right users.
- Mobile responsiveness – The in consideration the look and feel of your pages for mobile users.
- Map of redirects – Map out all existing and future redirects that need to be implemented. This is a very important requirement, so we will elaborate it more in Step 2.4 – Redirect Management.
- Page loading time (for desktop & mobile) – To avoid losing visitors, it’s important to have a low loading time of your important pages (preferably under 2 seconds), but this is also another important requirement that will be elaborated more in Step 2.3 when we will talk about website benchmarking.
Ensuring consistency throughout the complete Phase 2: Pre-Migration Preparation
starts by carefully evaluating all of these technical factors across your overall website architecture.
2.2. Evaluate The Website Prototype
Before any website development is done, it’s important to make one final review of the new site’s prototype and design. The evaluation is a crucial requirement for identifying SEO and UX issues right from the beginning. That’s why SEO experts need to be included here to avoid any major frustrations and wasted money.
Some of the aspects that need to be thoroughly evaluated here by the SEO experts:
- Review any radical changes in the design.
- Review high traffic-driving pages.
- Review major copy changes.
- Review the navigation.
2. 3. Benchmark The Old Website
Benchmarking your old website in terms of performance is essential for multiple reasons:
- Comparing the new website performance with the old.
- Diagnose which areas on the new site don’t work as they are supposed to work.
- Quickly resolve the issues of those underperforming areas.
But before resolving any issues, you need to start from somewhere, and the baseline is crawling your old website.
2.3.1. Crawl The Old Website
To make a thorough and quality crawl, you need a quality crawler … duh 🙂
So at this point, you need to crawl your old website and get complete data of all URLs, page titles, meta data, redirects, broken links, etc.
Here are our TOP 3 recommended crawlers:
- Screaming Frog: (RECOMMENDED!) This crawler is an industry-standard tool and a backbone of our SEO auditing tool set!
- Sitebulb: Comprehensive crawler for webmasters and SEOs. A clean user interface, nicely organized reports, and unique crawl visualizations.
- On-Crawl: Crawler and server log analyzer for enterprise SEO audits. It is an amazing data mining tool that can help your performance issues, crawl budget, content quality, backlinks, etc.


All of the crawlers have Trial version, but it’s fairly limited. If you have a small website under 500 pages then you can use the free version of Screaming Frog, but if your budget allows it, we suggest to buy this tool.

Regardless of your chosen crawler application make sure that the settings of the crawl aren’t too restrictive. Depending on the migration scope, make sure to set the crawler to:
- Ignore robots.txt
- Crawl all subdomains
- Crawl outside the root folder
- Follow internal “nofollow” links
- Change the user agent to Googlebot
Crawling your website will give you an insight into potential technical issues, such as bad status codes or redirect chains that need to be addressed at this step.
Recommendation:
Also consider exporting the old website data from your Google Search Console such as search queries, crawl, and structured data errors, URL parameters, links to your website, etc. You may need this data later after the migration is done.
Note:
You should keep a copy of the old site’s crawl data in a safe location for 5-6 months after the complete migration has been completed. You never know if you may need any of the old site’s data once your new website goes live.
2.3.2. Identify Top Performing Pages
Your top-performing pages are the pages that generate the most revenue, conversions and drive the most traffic. In order to organize the migration tasks by priority, it’s imperative to identify your top-performing pages first.
Now, open your Google Spreadsheet document and make sure to include the following fields:
- Indexable Legacy URLs (Include all important indexable URLs of your old website from the Crawl data)
- Pageviews during the last 12 months (From Behavior in Google Analytics you can export all Pageviews for all website pages)
- Revenue and conversions during the last 12 months (You can find this data in Google Analytics: Conversions > Goals or Conversions > E-commerce)
- Number of clicks from the last 90 days (Google Search Console > Performance can show you which pages get most organic clicks)
- Top linked pages with quality backlinks (Recommended software: Ahrefs – from where you can export all “Best By Links” pages)
Identifying top-performing pages or posts can be easily done by identifying those that generate most organic visits, that have a good conversion ratio, generate revenue and have many relevant backlinks.
ATTENTION:
BE EXTREMELY CAREFUL HERE!
This is where things might go wrong! If some of these pages are not identified, misconfigured or disappear without proper redirection, you RISK losing traffic and rankings!
So you need to put extra attention to these pages!
Now let’s move to the next logical step…
2.3.3. Keyword Rank Tracking
The next logical step, once you’ve identified your top-performing pages, is to take a look at the keywords you are ranking for.
Make sure that the most important search queries you are ranking for in the Google Search Console, are also being tracked in your rank-tracking tool.
Our TOP 3 choices of the best rank-tracking tools:
- Ahrefs (recommended)
- SEMrush
- AccuRanker


This benchmark reference is important, as you need to monitor these queries after the migration to make sure you’re getting back on track. You should make close monitoring of the profitable keywords that:
- Drive traffic to your website (especially keywords that are ranking on the first page),
- Generate leads and conversions
- Have a decent search volume (medium tail keywords).
Recommendation:
Don’t forget to track rankings across desktop and mobile devices as well.
2.3.4. Website Speed & Performance
You should benchmark the existing performance of your old website and set goals for addressing the speed issues with the new site.
According to one Moz performance study when they tested the performance of over 100k websites, they found that there is a clear correlation between a faster time to first byte (TTFB) and a higher search engine rank.
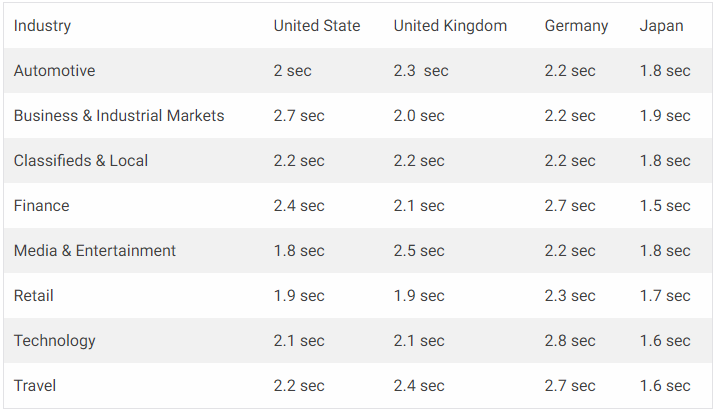
Source: Average Page Load Times by MachMetrics Speed Blog
While the average of the values in the table is 2.11 seconds, the recommendation is to be under 1.3 seconds.
Several studies have shown that the longer a page takes to load, the higher will be the bounce rate, lower traffic, and fewer sales.
It’s recommended that you review all major website page types using the industry-standard tools:


You could use summary tables like the ones below to benchmark some of the most important performance metrics, which will be useful for comparisons once the new site goes live.

2. 4. Redirects Management

Regardless of the type of migration you are undertaking, redirects management is probably the most crucial activity that needs to be addressed with extra care and precaution.
Attention:
If you fail to properly map out the redirect plan at this step, you risk losing your website traffic and SEO rankings.
The purpose of this redirection plan is to identify which URLs and domains need to be redirected when you migrate your existing website.
The easiest approach is to open your Google Spreadsheet and make a list of the URLs that are currently redirecting and put these in a spreadsheet with 3 columns:
- Column A: The legacy URLs that are being redirected currently.
- Column B: The destination of the existing URL redirects.
- Column C: The destination of the new URL redirects.
Let’s look at our example:

Note that you may already have existing redirects within your old website that also need to be migrated without causing redirect chain.
A chained redirect is a traffic and ranking killer that occurs when one URL is requested, and a redirect is used to redirect it to another URL and in turn, this particular URL is further redirected, and so on.

Pro Tip:
If you are migrating to a brand new domain, make sure to avoid the redirection chain where the ‘Oldest Redirected URLs’ redirect multiple times.

9 Important Things To Consider When Mapping Your Redirection Plan
- As we have shown in our example, always make sure to redirect the old URLs to the most relevant new URLs, instead of just redirecting them to the new homepage.
- Pay attention to the right protocols (http vs. https).
- Pay attention to your paid campaigns as well! You also need to preserve the UTM parameters of your PPC campaigns.
- Pay attention to non-www URLs and its redirection to their www equivalent.
- Pay attention to the upper-cases! All URLs with upper-case characters should be 301 redirected to all lowercase URLs. (Ex: webmax.com/Seo to webmax.com/seo)
- Pay attention to the trailing slash: All URLs without ending trailing slash should redirect to a version with a trailing slash (Ex: webmax.com/seo to webmax.com/seo/)
- Avoid JavaScript redirects or meta refresh. Also, 302 redirects should be used rarely.
- As Google suggests, you should redirect the old image URLs to the new image URLs for faster image discovering and indexing.
- Never redirect penalized domain to your new domain because the penalty will be transferred to your new domain.
When you finish this redirection plan, sent the Spreadsheet document to the development team to create the redirects. Your developers need to give their best effort to thoroughly test these redirects before launching the new website.
The Scariest Consequences Of Poor Redirection Management
- Consequences can be catastrophic if you misconfigure the important redirects.
- Users will land on 404 Not Found pages that don’t meet their user intent.
- Ranking signals won’t be passed from the old pages to the new ones.
- Search engines will take forever to index your new website pages.
- The traffic, bounce rate and conversion rate will TANK.
- The organic search visibility and rankings will DROP.
Spend as much time as you need here and once the redirection management is fully finished, you can move to the Staging Environment setup.
2.5. Set A Separate (Staging) Environment
 It’s common knowledge that all technical changes and tests on your website need to be done on a separate (staging) environment.
If you think about it, this is logical since it’s highly risky to make any significant changes in a live environment because if things go wrong… you are gonna have a bad time (and so will your users).
Major Benefits Of Having Separate Environments:
- Functionalities Test – On staging you can easily test all new functionalities to see if everything went smooth before going live.
- Website Architecture Review (navigation, categories, sitemaps…)
- Content Evaluation – Check the SEO optimization and setup of your content.
- Identify Inconsistencies between the old and new website.
What To Keep In Mind When Setting Up The Staging Environment
- If the migration scope allows it, you can create the new environment on a separate subdomain such as: https://new.website.com (instead of working locally).
- If you’re changing domains, you need to keep your old website by placing it to an old environment such as: https://old.example.com (and protect it from the Search engines)
- Make sure your new environment is also protected and not publicly accessible.
- Best ways to forbid access and protect your environment from search engines:
- Whitelisting (recommended) – We highly recommend whitelisting ONLY the IP addresses at your office/home that are allowed to access the environment. By doing so, you will prevent Search engines from crawling the staging environment. This is the best way because only the authorized people could easily access and crawl the website without any issues.
- Username/password authentication – You can allow environment access by HTTP authentication and prevent other unauthorized people from accessing it. However, the downside here can be crawler that cannot access the password-protected website for a test crawl before going live. Or if the crawler can login and access it, there is a risk for it to create or remove pages, install or uninstall plugins, etc… because it will click on every possible link.
- Robots.txt Directives – You can always place Disallow directives in this file for your staging environment. However, the reason why this is not the best way to forbid access is because these directives don’t prevent other people from accessing the environment, and the Search engines will not always honor these directives. Another downside of using this method is that the robots.txt file with these directives can easily be forgotten and can cause serious de-indexing issues when moved to a live website.


Website Migration Phase #3 –
Pre-Migration Testing
Now it’s time to do pre-migration testing where you will TEST all technical aspects. To avoid unnecessary migration delays, it’s always smarter to “measure twice and cut once.”
Once you are well-prepared by finishing up all of the previous site migration arrangements, it’s time to do pre-migration testing where you will TEST all technical aspects.
And the sooner you start with this pre-migration testing, the better.
Identifying the possible issues at this phase is certainly more cost-effective than doing it later after the launch date. That’s why to avoid unnecessary delays and resources, it’s always smarter to measure twice and cut once, especially when complete website overhaul is taking place.
So this step will help you ensure that you can welcome the Launch Day with confidence.
Let’s start with the basic SEO checks…
3.1. Testing Technical SEO
To make your new website SEO proof, you should fire up your favorite crawler and go through all of these checks:
- URL Review: Go through the list of URLs (canonical links, navigation links, header & footer links, body content links, pagination links, etc). Also, check for broken links and make sure that the internal URL structure is correct.
- Meta Data Review – Check if the titles and meta descriptions of the new website are in line with your SEO strategy.
- Body Content Review: Check if all of your pages and posts are SEO optimized. Don’t forget the user-generated content as well (comments and reviews).
- Structured Data Review: Be sure to check the markup on both the desktop and mobile pages. Pay attention to structured data such as Schema, Open Graph, and Twitter Cards using Google’s Structured Data Testing tool.
- Robots.txt Review: Carefully check if the current robots directives are preventing pages from getting indexed. This is a common issue, so make sure there are no unnecessary directives such as Disallow: / present on the live website.
- Status Codes Review: Check if the new website pages are returning the correct status codes. These codes are mostly used: 200 code for correct status, 301 code for redirects and 404 code for pages that don’t exist.
- Pagination Review: If you’re using pagination on your new website (usually for archive, blog or category pages) ensure that the new pagination is properly implemented.
- Hreflang Review: If your website is available in multiple languages, make sure that the hreflang tag attribute is correctly configured.
- XML Sitemap Review: Double check if your new website has a valid XML sitemap with indexable pages (no more than 50,000 rows and no more than 50 MB).
3.2. Testing Page Speed
Before making the final LAUNCH, you should also consider checking the page speed once again, while the website is still on the development stage.
You can use the same Google Spreadsheet from before when you’ve made the Page Speed Benchmark.

Take a closer look at the previous slow pages and compare them to see if there is any progress with your current new website. You can put more attention on:
- External resources (Images, JavaScript, and CSS).
- The HTML code and the number of HTTP requests.
- Web server’s configuration and response time.
3.3. Testing Domain Redirects
We are back to the Redirections.
That’s not because we are in love with Redirections 🙂 but because they are so important and need to be analyzed multiple times. To prevent future headaches and save yourself from a lot of troubles, testing the redirects before your new website goes live is HIGHLY IMPORTANT.
Start by ensuring if the root domains are set up correctly.
For example, if you decide your preferred domain version to be: https://domain.com, then make sure all 3 other versions have 301 redirect to your preferred canonical domain version.

However, this step for selecting a preferred domain in Google Search Console needs to be accomplished later in Phase 4 – The Launch Day. For now just ensure that all domain variations are properly redirected to your preferred root domain.
You shouldn’t move to website launch just yet until you go through this step.
Now from your recent crawl on the staging environment, check for redirection issues such as:
- Redirect chains (pages redirecting multiple times)
- Redirect loops (pages that infinitely redirect to themselves)
- Redirects with bad status codes (4xx or 5xx server response)
- Canonical loops (pages with canonicals pointing to each other)
- Canonical chains (pages with canonicals pointing to other pages with canonicals)
- Protocol interlinking issues (redirect to mixed content HTTP to HTTPs or www to non-www)
- Trailing slashes issues – To slash or not to slash? Be consistent and use just one version of your URLs, preferably WITH trailing slash /.
- Whitespace characters in URLs – Use trim() or substitute() functions in Excel to eliminate white characters.
- Invalid characters in URLs – Try to avoid using invalid characters in your URLs, but if you have to, please read how to make URL encoding.
Note:
Currently, your site is not live yet and you can’t test the correct final redirect destination of your URLs. However, you can always double-check if the redirect destination is the intended one.
3.4. Testing Responsiveness

Mobile-first indexing algorithm recently enforced by Google predominantly uses the mobile version of your content for indexing and ranking. So to avoid any issues associated with this algorithm and hence your rankings, you should thoroughly review the mobile version of your website.
If your staging environment allows it, you should now check for any possible inconsistencies between the desktop and mobile version of your pages in the following areas:
- A responsive website must serve the same content across all devices (with the use of scalable CSS and media queries).
- Make sure that Googlebot can access all essential assets (Images, JavaScript or CSS files).
- Make sure meta=”viewport” tag is placed within the <head> of each page to signal browsers that a page is responsive.
<meta name=”viewport” content=”width=device-width, initial-scale=1.0″> |
Note: If you fail to configure this tag, Google may identify your page as not mobile friendly.
- Make sure that the content of your pages is not wider than the screen (avoid horizontal scrolling).
- Make adaptable font size on mobile and tablet devices.
- Eliminate the intrusive promo features (ads, sign-up forms, pop-ups, etc).
- Put the appropriate margin or padding space between the clickable elements (buttons or links) and make sure they are not too close to each other.
- Maximize the mobile pages speed.
Great tool for checking Mobile Responsiveness is the Google’s mobile-friendly tool where you can test how your new visitors (once you go live) will use your website on a mobile device.
3.5. Issues Treatment
You are close to the migration day, hang on!
As you are performing the pre-migration testing, you’ll always spot issues.
Most of the issues can be fixed during this stage, but some issues need fixing after launch.
Use your best judgement and common sense about the best issues treatment here, but keep your goals always in mind.
Remember:
Identifying certain types of issues at a post-migration stage can be costly.
In addition, pushing back a release will require more resources, can cause significant deadline delays and a lot of headaches.
However, if nothing serious comes up or there are some small issues that you can fix later (like simple Search and Replace database query), you can be comfortable with the next phase: Launching!
Website Migration Phase #4 –
The Launch Day
The Launch day is exciting (and maybe a little scary). But if you done everything right by working with a competent migration team, you can proceed with confidence today!

Finally, it’s the D-Day… or better yet, the L-Day.
The L(aunch) day is always exciting (and maybe a little scary).
But since you’ve gathered the most competent website migration team, you are well prepared by now and there is nothing to be afraid of (especially if you’ve done thorough pre-migration testing in the previous phase).
Probably all major issues have already been taken care of by now, and you should proceed with absolute confidence today.
Let’s go through the major site migration activities for today…
4.1. Make The New Site Accessible
Remove any limitations that you’ve set up there to keep out Search engines and users prior to launching, such as:
- HTTP authentication (as discussed previously in Phase 2)
- Any robots noindex directives (both meta robots and X-Robots-Tag)
- Any Robots.txt disallows (make sure the Search engines are not blocked from crawling)
Now update your DNS records of the domain to point them to the new environment.
Pro Tip:
If you were using a subdomain for your staging environment (such as new.domain.com), today you can go live by switching the website URL address in the database.
That’s our preferred method for all site migrations we’ve done so far, and it works best if you don’t want to have any downtime on your live website.
First put your old legacy website on another subdomain such as old.domain.com (if you haven’t done it already). Remember when we talked about staging environment setup, you should always keep your old website data usually by placing it to an old environment and protect it from the Search engines.
Now it’s time to switch the URL address of the new website in the database, from the subdomain to the root domain.
By doing so, the staging environment new.domain.com now goes live to domain.com.

Congratulations!
If you’ve executed each stage properly, now you should have a brand-new fully-functional website.
Good job so far, but the migration process doesn’t end here.
You still have a few more things to go through.
4.2. Perform Live SEO Check
As soon as you’ve made the new website publicly accessible, you should take a look at a few technical SEO checks:
- Check robots.txt file – Ensure there are no unwanted directives that misguide the Search engines. An invalid robots.txt file can cause two major problems: not crawling public pages and crawling unwanted pages with sensitive information.
- Check top pages redirects – Ensure the redirects from your old site’s top pages redirect correctly to the new relevant one. Make sure the users who request these pages do not land on 404 pages and that the link equity that existed previously had remained still on the site.
- Top pages canonicals – Ensure consistent canonical URLs. The rel=canonical element, helps webmasters prevent duplicate content issues, so use it wisely.
- Top pages status code – Ensure 200 status code on your top pages. This status code indicates that the request was successfully completed and the server gave the browser the expected response.
Recommendation:
You will need to run your favorite crawler once again and ensure everything works fine!
Note:
If there is a need for the website to go temporarily down, make sure the server will respond with a 503 (service unavailable) response. This will tell Search engine crawlers that there is a planned site downtime temporarily for maintenance, so they come back to crawl the site later.
In this case, make sure the website is not down for too long because it’s possible for the organic search visibility to be negatively affected. This way, there is a risk for a difficult recovery later when the website will go live.
4.3. Search Console Actions
The following activities should take place as soon as the new website has gone live:
- If you’ve migrated to a new domain, put all versions of the domain:
- https://webmaxformance.com
- https://webmaxformance.com
- https://webmaxformance.com
- https://webmaxformance.com
- Test & upload the XML sitemaps (to speed up the indexation process)
- Set the Preferred version of the domain (www or non-www)
- Set the International targeting (if applicable your site is multilingual)
- Configure the URL parameters (if needed because incorrectly configuring parameters can result in pages being dropped from Google’s index)
- Upload the Disavow file (if you had a list of suspicious spammy backlinks that you want to block from harming your new website)
- Use the Change of Address tool (if you are making migration by switching domains)
Pro Tip: Use the “URL Inspection Tool” feature for each different type of page (for example the homepage, category, blog post, product page, etc). This tool is useful to make sure Googlebot can render the page without any issues. Review any reported blocked resources and make sure the page can appear in Google Search results.

Website Migration Phase #5 –
Post-Migration Review
The post-migration check ups are done after the website will go live (in the first 2-3 weeks). The advantage in this phase is the ACCESS to more live data and more tools for live testing.
The post-migration checkups are done after the website will go live (usually the first 2-3 weeks afterward), and they will mostly overlap those check-ups we’ve performed in Website Migration Phase #3 Pre-Migration Testing.
Sorry for being repetitive here, but we shouldn’t neglect this phase because if there are some serious undetected issues after migration, they will DIRECTLY impact the website performance in the Search engines and harm its rankings.
The nice advantage in this step is ACCESS to more live data and more tools for live testing.
This will help us to be more thorough and accurate during the complete post-migration testing, and as a result, we will be able to quickly resolve any potential issues. One of the advantages is access to the complete Google Search Console features.
Here’s what we mean…
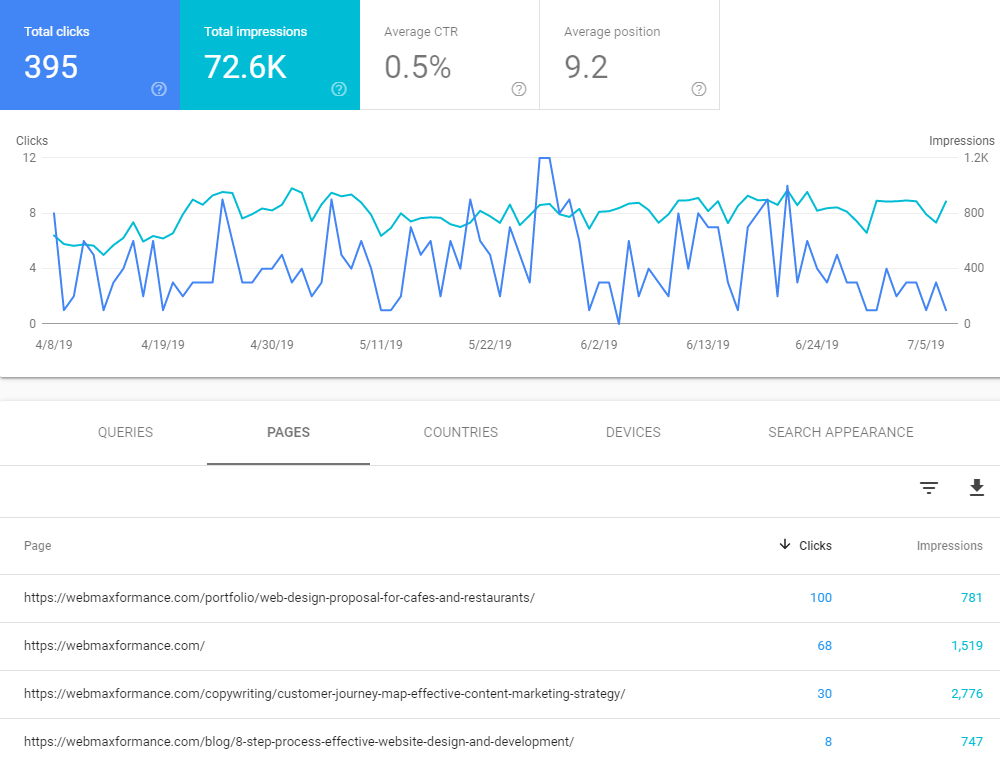
5.1. Observe Search Console Crawl & Server Logs
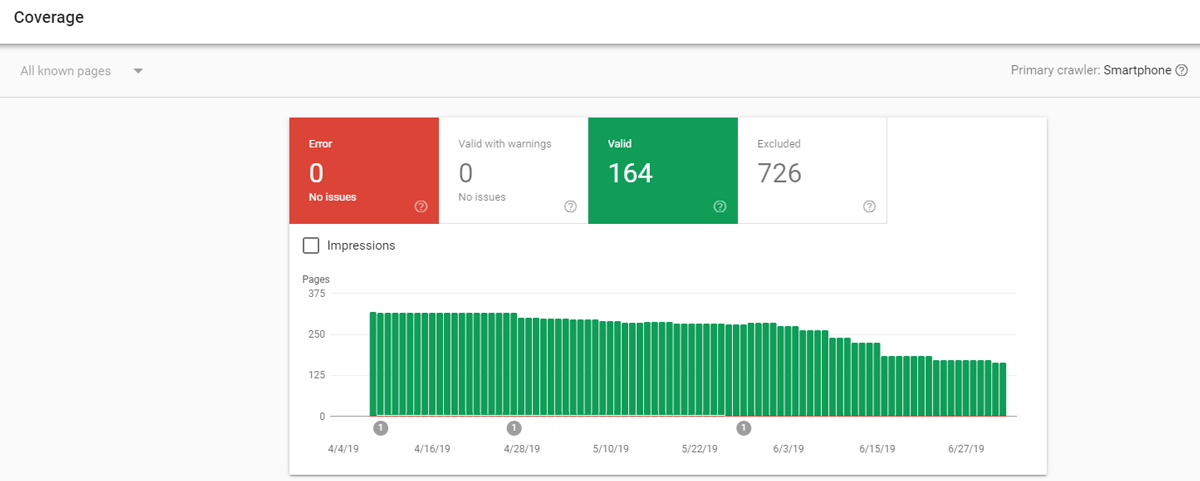
Once you went live, you should closely observe the crawl stats that are now available in the Search Console. You should put attention on the Coverage section and make sure that the pages available in your sitemap are fully crawlable by the Googlebot.
Reviewing the server log files is another effective way to spot any crawl issues that may appear after the migration. Keep an eye on the Awstats feature from your cPanel.

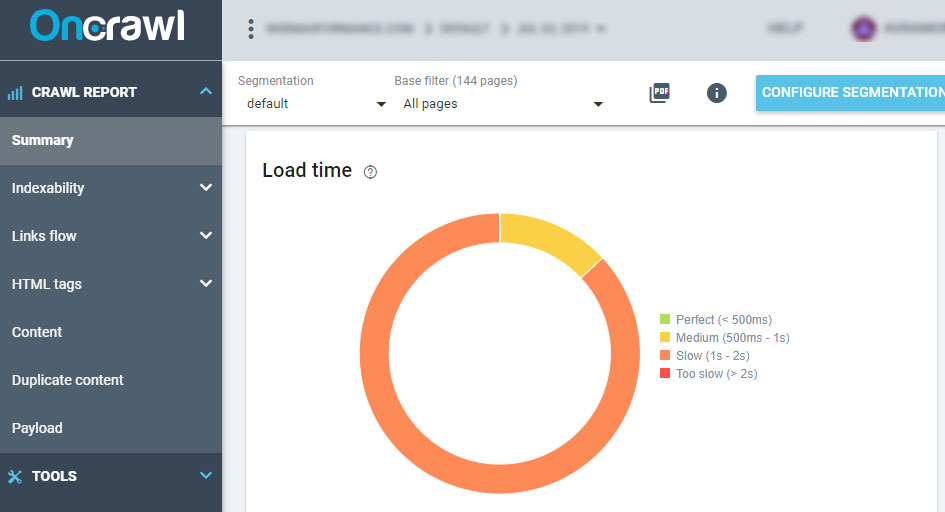
If your budget allows it, you can use tools like Botify and OnCrawl to get even more detailed monitoring reports because they can combine crawls with server log data and alert you INSTANTLY if something goes wrong.

Note: In Google Analytics you can easily discover which are the most commonly requested 404 URLs and fix these first by making relevant redirections!
Navigate to Google Analytics -> Behavior -> Site Content -> All Pages. Set Secondary dimension: Page Title and put 404 in the search box. It will list all 404 pages that are requested by your users, and fix them immediately.

Recommendation:
For the first 2-3 weeks you should keep an eye for reported crawl errors from your tools and take necessary actions (such as implementing 301 redirects on all possible 404 errors).
5.2. Measure Website Speed
The next aspect you should closely review after the migration is the site speed. Every webmaster knows that fast site speed is an SEO ranking signal across the devices (mobile and desktop).
So you should test your important pages multiple times and give your best to improve them maximally because every millisecond counts. In an ideal case, all of your pages should have faster loading time than the pages from your old website, but if that’s not the case, you should take immediate action.
Most of the crawlers can help you identify all slow pages on your website, but you should also check the most important ones manually one by one.
Evaluating Speed Using Google Pagespeed Insights
The Pagespeed Insights Tool is probably the most important tool for measuring page performance on desktop and mobile devices. This tool checks for a page best practices and calculates an optimization score.  If your most important pages have a dangerous RED light here for the Performance score, then you should put extra attention to the optimization suggestions (Opportunities and Diagnostics section) where Google gives you a list of best practices that need to be applied on your page.
Evaluating Speed Using Google’s Lighthouse
Google’s Lighthouse is an automated performance tool for identifying common problems that can affect your website performance and user experience.
It can be accessed with a right-click on your page -> Inspect -> Audits.

You can use this tool for analyzing any important page you want to measure for performance, accessibility, SEO, etc.
If you follow the recommendations from both of these tools, you can easily fix the major performance issues on your page.
As a result, you can expect boosted rankings and improved user experience, and that’s what Google really wants!
Evaluating Speed Using Google Analytics
You can also evaluate the speed from real users that are visiting your website, simply by using Google Analytics.
By navigating to Google Analytics -> Behavior -> Site Speed -> Overview, you can easily compare the new site’s average load time with the previous one and see if you have a positive improvement.

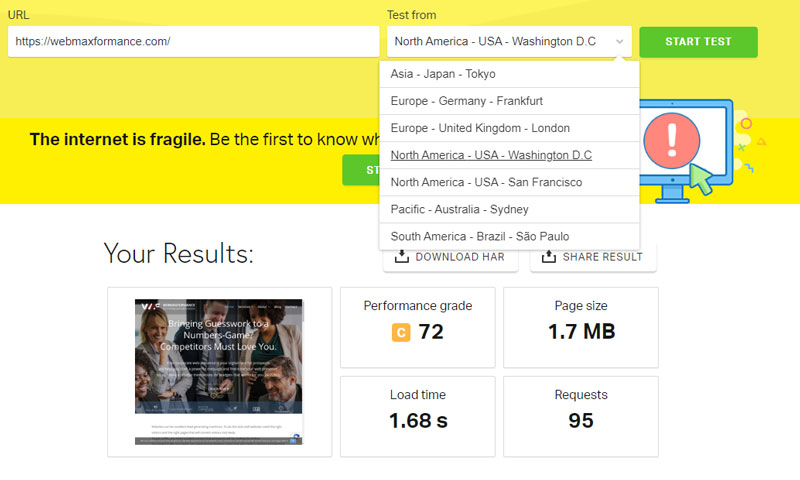
Evaluating Speed Using Real User Monitoring Tools
Other great tools for page speed evaluations are:
By using these tools, you can check how different website visitors experience different loading times based on their geographic location (USA, Europe, Australia, etc.)
5.3. Check Mobile-First Indexing
Mobile-first indexing algorithm is one of the most important ones in the SEO world, as we previously mentioned in Phase 3. Starting July 1, 2019, mobile-first indexing is enabled by default for all websites, so it’s imperative to review your most important pages using a mobile user-agent.
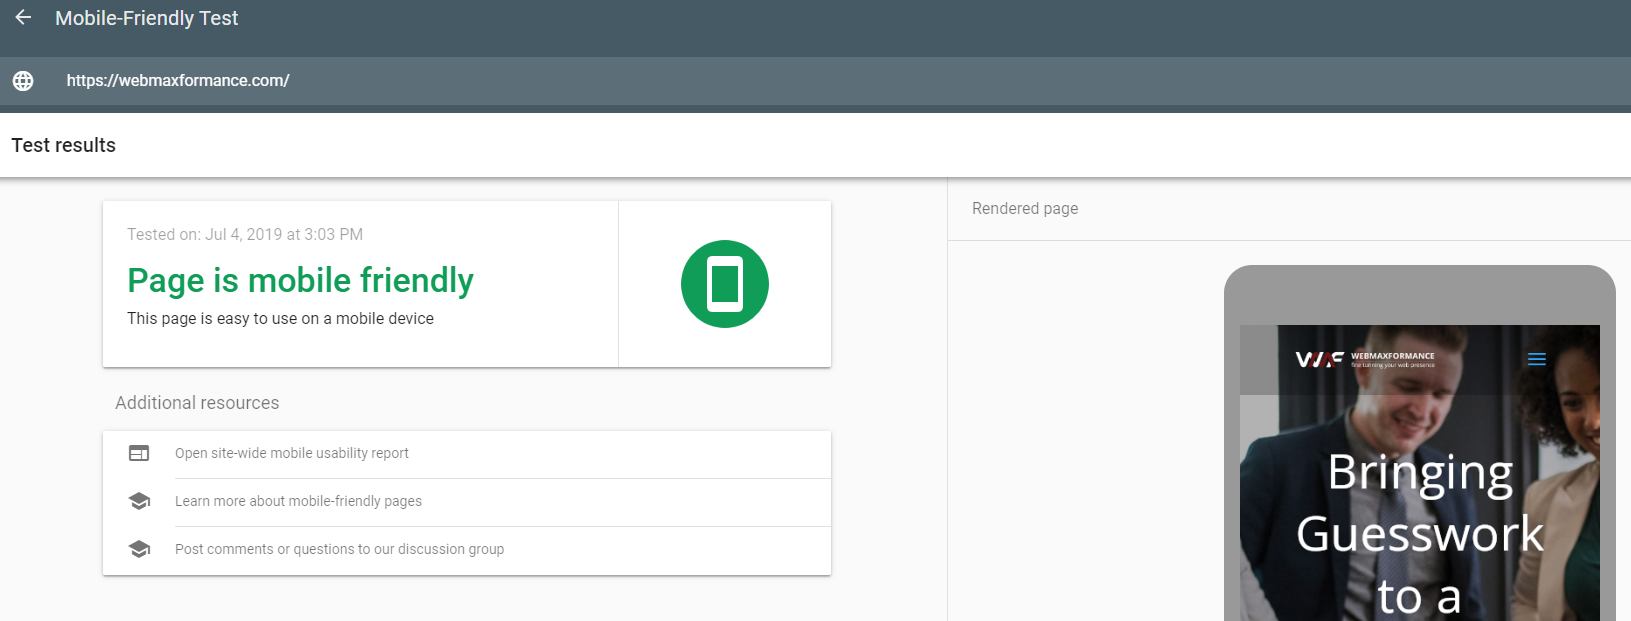
Same as previously when you checked your staging website, now use Google’s Mobile Friendliness tool once again for checking your live website.
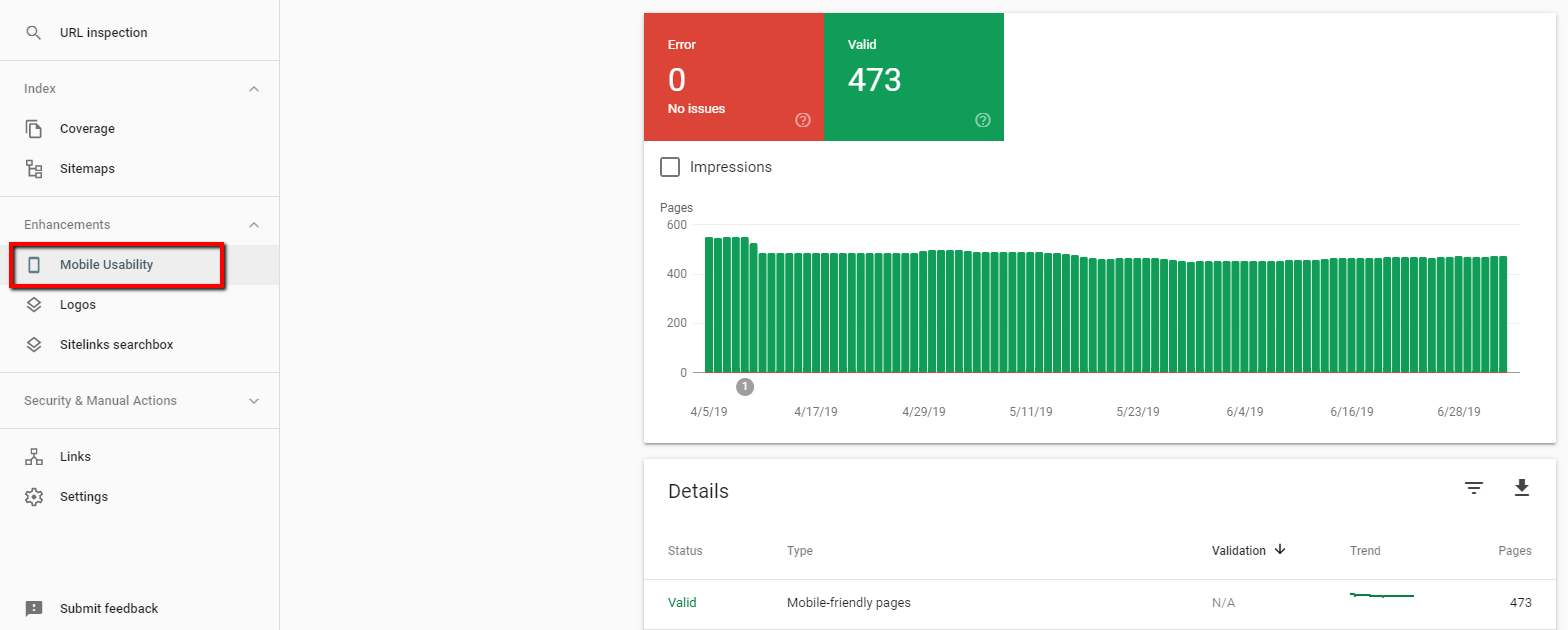
Another advantage here is that you can ensure full mobile-first index compatibility, by taking a close look at Mobile Usability from your Google Search Console.
To make your website fully compatible with this algorithm (and fix the potential errors present here) please refer to the steps outlined in Phase 3.4. Testing Responsiveness.
Website Migration Phase #6 –
Migration Monitoring & Evaluation
After the Launch day it may take about 1-2 months of monitoring to see the real results for smaller websites (or 3 for larger).

How Long For A Post-Migration Monitoring?
The hard part is finally over and now it’s time for on-going monitoring and evaluation.
Speaking of evaluation, now you probably ask yourself if the migration has been successful.
We are afraid that the answer can’t be really clear as soon as your new website goes live.
It takes some time to see the real results because, according to our experience, the rankings can fluctuate in the first couple of weeks, especially if the website is larger in size and authority.
After the Launch day, it may take about 1-2 months of monitoring to see the real results if the website is smaller in size. It may take at least 3 months if the website is larger in size.
This is not some general rule we have written in stone, because there are also many other small factors that can impact your website after the migration. It’s possible to see the results immediately after the first week, or later after the 4th month.
Just give it some time, let users adjust to the new website architecture and let the Search engines fall in love with your website once again.
Now can be a good time to answer these evaluation questions:
- Were all the website concerns and issues fully addressed?
- Are you satisfied with the outcome of the migration?
- What would you improve in your future migration?
What To Monitor?
The short answer is – Performance!
We are well aware that your most important KPIs (Key Performance Indicators) will be traffic and conversions. However, there are many more metrics you should closely monitor in the first couple of weeks:
- Desktop and mobile rankings (Monitor the ranking positions of your most profitable keywords with reliable rank tracking tools such as Ahrefs or SEMrush).
- User engagement (Monitor the bounce rate and average time on site with Google Analytics).
- User sessions per page type (Monitor if the page types are driving more sessions from previously before the migration).
- Conversion rate per page type (Monitor if the page types are driving more conversions from previously. While you are here, check the conversions by device).
- Monitor the number of submitted and indexed pages (using Google Search Console).
- Site speed (Compare the Average Site Speed with the previous period before the migration using Google Analytics).
If you are getting positive results by monitoring the mentioned areas after a few weeks, then you can be confident to say that the migration has been a success. You can now finally go out to celebrate with your colleagues.
Finishing Thoughts On Website Migrations
![]()
Phew. That was a long journey!
As you are probably aware by now, website migrations can be extremely tricky.
They need to be executed with a spot-on technical precision and solid organization & planning.
Website migrations are hard enough by default!
And there’s no need to make them harder by doing all the work by yourself.
Or get lots of headaches by working with incompetent migration team.
Or burn your pocket with unnecessary migration expenses.
That’s where our capable site migration team of WebMaxFormance Agency will come in handy and do all the heavy lifting for you throughout all 6 Website Migration Phases.
In our 10 years of experience, we’ve done hundreds of migrations for our clients and we can help you undertake your migration with ease, regardless of its type.
With military-precise work and constant manual checkups, our migration technicians will make sure that your website after the migration will become 100% lovable by the Search engines and your audience as well.
If you reached this far, as a thank you, we have a FREE gift for you…
[FREE] Website Migration Checklist 2020
P.S. Good luck with your migration adventure and if you need any consultation or assistance with your site migration, please get in touch!
[js-disqus]
